I want to set up Pegasus Mail (‘PMAIL’) to use Gmail on one of my computers because the computer is a bit old and using a heavy application like Thunderbird or Firefox is a bit slow. The Pegasus Mail setup wizard holds your hand through this, and makes it pretty easy. And I don’t think I needed admin, either.
From previous experience, if I let it install to C:\PMAIL, it will put my mail in there as well, and anyone else who logs into this box will be able to see my mail, or at least see the folder it is in. So I installed it into:
C:\Users\USERNAME\installs
I do note that this folder path has no spaces in it. I don’t know how PMAIL plays with paths with spaces, but I chose to avoid them.
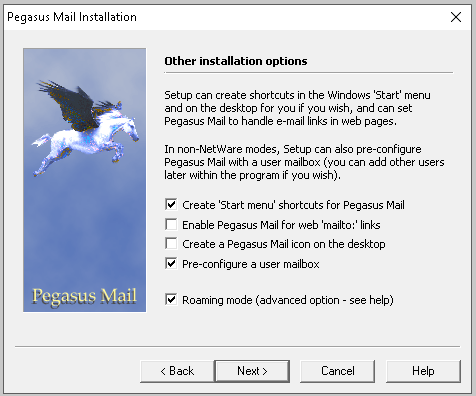
I don’t want it to deal with ‘mailto:’ links (yet), and I don’t want a desktop shortcut, so I unchecked these options. The Roaming option was not be relevent here.
It ran and the installer exited.
Now, I could run it from the Start menu. I just ran ‘Pegasus mail’ (no admin). The account setup wizard started.
The dialog said:Do you use Gmail…? and gave me a single ‘Gmail’ button to push. I pushed it!
OK!
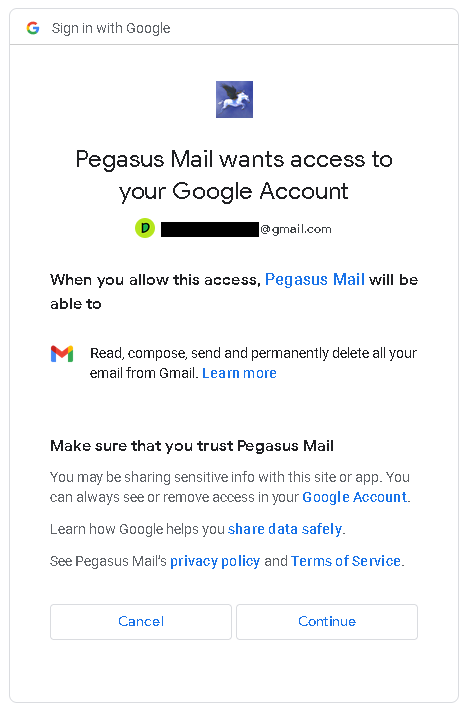
I put in my Gmail address, did not mess with any defaults, and clicked OK. It then gave me a dialog that told me we were about to ask Google for permission to use Pegasus Mail with Gmail. I clicked Transfer and logged in.
And… a window opened in my browser, taking me to the Gmail sign-in windows and then back to PMAIL.
OK, now I’d rather use IMAP than POP3, so in PMAIL I go Tools > Internet options and Receiving (POP3) and disable that profile. The installer has also created IMAP, and I want to use that in preference. If you are not careful with your settings, POP will download all your email off the server and delete it from the server! There are options to set in PMAIL to prevent that, but IMAP is generally to be preferred anyway. POP was rather designed on the assumption that you’ll only access your email from this computer, using this software, and although the settings let you avoid that assumption, and POP is fine really, IMAP is more modern and is generally to be preferred if available (as I understand it).
Also in Tools > Internet options, I add my email address to the General tab.
Now, I click on the icon of the Earth with an arrow coming out of it.
Nothing.
Restart PMAIL. OK, can I send a mail? Seems I can. OK, maybe I have to enable IMAP explicitly. Duh! When I go Tools > IMAP profiles, I see a ‘Connect’ button. Press that. It is working. I can see in the status bar that PMAIL is grabbing lots of folders, and now they appear in the PMAIL window!
That was easy enough.
Click Done.
Great. Looks excellent. Last step was to pin the PMAIL icon to the taskbar before exiting.
Now, PMAIL has a lot of configuration options, many of which are not available in other software. It works out of the box, but you may want to spend some time hunting around and looking at your other options. Its mail filter is especially powerful.
clicked on my account name at top-right, and selected Account Info
clicked on Security
clicked on Generate and manage app passwords.
The password is a string of 16 characters. AOL will present it in 4 groups of 4, like this: aaaa bbbb cccc dddd; but you type it in all in a row: aaaabbbbccccdddd.
On the FreeDOS box, I created the folder
C:\NET2\AOL
I unzipped the PMAIL350.ZIP archive in this folder. In the AOL folder, I created subfolders AOLIN, AOLOUT and AOLMAIL.
Next, I needed the programs to get and send the mail. These are PMPULL and PMSMTP from http://macall.net. Amazing stuff!
I unzipped these elsewhere, and copied PMPULL.EXE, PMPULL.CFG, PMSMTP32.EXE and PMSMTP.CFG into the AOL folder.
First, we can set up PMPULL to pull the mail off the server. For that, we edit the configuration file:
C:\NET2\AOL\> type pmpull.cfg

my_ip=dhcp
bootpto=30
mss=576
maildir=c:\net2\aol\aolin\
rettime=365
pop3host=pop.aol.com:995
pop3sec=LegacySSL
The main things here are the AOL POP3 server and port, the LegacySSL flag and the folder I want the mail dumped into. Note that this assumes I have a working packet driver for DOS networking, and a valid WATTCP.CFG file, whose folder is pointed at by the environment variable of the same name:
set WATTCP.CFG=C:\FREEDOS\BIN
To pull off the mail, I need to type something like:
I can put this line in a batch file called (say) PULL.BAT, but if I do so I am storing my password in the clear. So if that is a problem I can:
stop
password the BIOS on the computer
live with it
retype the app password whenever I want to get mail
go through some contortions to turn the batch file into an obfuscated binary.
Whatever. This worked, much to my surprise. Now, I had to set up PMAIL.
PCONFIG
I ran PCONFIG.EXE and …
First, chose Standalone config and told it my mail folder (C:\NET2\AOL\AOLMAIL).
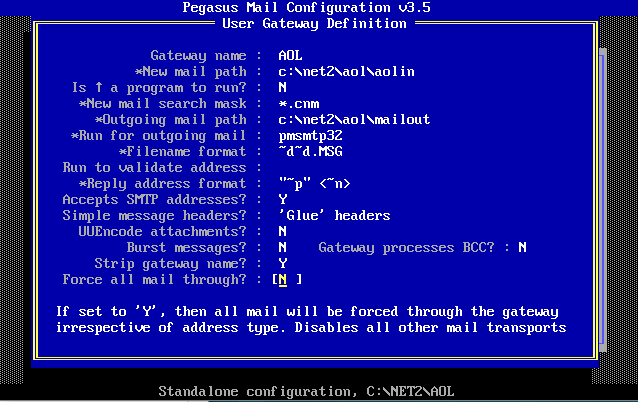
Second, selected Manage user-defined gateways and created a new one called AOL. Put the correct new mail folder in here (C:\NET2\AOL\AOLIN), and put *.cnm as the new mail search mask. Set outgoing mail folder — I’ve used C:\NET2\AOL\AOLOUT (error in the image…).
Note that in pmsmtp.cfg and pmpull.cfg, these mail paths must have a trailing backslash!!!!
Filename format must be specified as: ~d~d.MSG
(this is PMAIL language, but the key thing is that the sending agent will expect MSG extensions, which is not the default. The ~d~d is code for ‘make up some unique forename’ — remember that DOS file names only have 8 chars!)
Then set Reply address format to: “~p” <~n>
(Again, this must be exact; it basically constructs the header that the sending agent expects. This is all in the very excellent docs for PMSMTP.)
Accept SMTP address = Y
Simple message headers must be ‘Glue’
(Again, this is part of constructing the outgoing mail so that when the sending agent looks for it, it finds what it expects.)
In the box for the program to run when sending mail, I put PMSMTP32.
Now, created PMSMTP.CFG — but first I need to MIME encode my username and password.
For this, I can use PMAIL itself. (From the PMSMTP docs.)
In DOS, typed:
copy con pass
MYPASSWORD^Z<Enter>
That is, copied from the console (screen) to a file called pass. <Enter> means ‘hit Enter key’ and ^Z means Ctrl+Z.
Typed my password, but did not hit Enter (don’t want an Enter character in the file! It will get encoded and make it wrong). Instead, typed Ctrl+Z to tell DOS to end the input, then hit Enter.
Did the same for my email. Something like:
copy con email
email@email.email^Z<Enter>
Now, ran PMAIL.
PMAIL (Pegasus mail)
Created a new message and attached these two files (pass and email), and chose the encoding as Basic Mime.
PMAIL message editor
Ctrl+Enter to exit the Attach files dialog, and again to send.
Quit PMAIL. PMSMTP32 complained because it could not send them … of course.
In AOLOUT, found 3 new files. One was the message, and two were the attachments. At the very end of each of the attachment files (which are pretty self-explanatory), found a line like:
aBfhd5gdhej==
this is the mime-encoded password or email. Copied these bits into PMSMTP.CFG as shown below. Note use of double-quote marks.
Note the AOL SMTP address and port, and the maildir. b64userid is the MIME-encoded email address, and b64passw is the endcoded password.
So what happens here is that PMSMTP32 when run will look for mail ready to send in the AOLOUT folder and, if found, will send it.
Next. I wrapped it all in a batch file called AOL.BAT, which I put in my PATH.
@ECHO off
REM Disable CLOCK, because PMAIL has its own...
CLOCK /D /Q
REM Time zone stuff does not seem needed for AOL -- but may
REM be needed by servers I send mail to from AOL, so keeping...
ECHO Set the time zone to EST before starting Pegasus mail.
ECHO This is so that the time in the header of any mail
ECHO to be sent does not confuse any mail servers.
ECHO My time and date:
DATE /D
TIME /T
set TZ=EST
C:\NET\PICOSNTP\PICOSNTP /q /d5 pool.ntp.org
C:\NET\PICOSNTP\PICOSNTP /q /d5 pool.ntp.org
ECHO EST time and date:
DATE /D
TIME /T
SET STARTDIR=%CD%
C:
CD \NET2\AOL
CALL PULL.BAT
PMAIL -U email@email.email
CD %STARTDIR%
SET STARTDIR=
ECHO Time should now go back to Australian
ECHO Eastern,if I have the TZ code correct...
SET TZ=AEST-11AEDT
C:\NET\PICOSNTP\PICOSNTP /q /d5 pool.ntp.org
C:\NET\PICOSNTP\PICOSNTP /q /d5 pool.ntp.org
ECHO My time and date:
DATE /D
TIME /T
CLOCK /E /Q
It is pretty self-explanatory, but that has never stopped me before.
First, I want to be able to run it from anywhere, so I put this file in my C:\BIN folder, which is in my PATH. However, these programs work best when run from the directory where they live, so I save the current path to STARTDIR then go to the AOL PMAIL folder and start the real work.
I set the computer to US EST time by changing the TZ variable and running picoSNTP (comes with FreeDOS). I run it a couple of times to be sure (learned this by trial and error). Australia is in a time zone ahead of the US, and if PMAIL constructs a mail header with a date and time in the future, and PMSMTP32 tries to send that mail, some mail servers will check the time, not realise the time zone (if indeed that information is in there), and reject the mail as being impossible.
The batch file runs PULL.BAT — that is, I check for new mail at the start of my session. I can set it up to check from within PMAIL, but I did not; I do not check again during the session. This is not as big a deal as it sounds, because DOS is single-tasking, so I cannot leave the email program running — I exit out of it to do other work, and when I rerun AOL.BAT the check for new mail happens again. The check takes a minute or so, but I do not find it onerous. I like the idea of downloading the email, deadling with it, and exiting. Exiting is great. I feel like modern email is always there, just waiting to give me something to do…
Then I run PMAIL and do whatever I need to do. Read and send email, presumably, including sending files. You can shell out from within PMAIL, and view any emails you’ve saved as HTML (I have not tried this extensively). If you use this a lot, you’ll find that many of the sites that send you automatic emails and bulletins will have an option for plain text emails, which will be a lot easier to read.
When I write a new email inside PMAIL, it is saved in the AOLOUT folder. When I send the email, PMAIL invokes PMSMTP32, which looks for any messages in that folder and sends them one after another until they are all gone. It will flash up some messages one the screen while doing so, which may look a bit messy. If you catch a hint of anything looking wrong, shell out (Ctrl-F10) and look in the AOLOUT folder. If it is not empty, something went wrong.
When I exit PMAIL, the batch file takes me back to the folder where I was and resets my clock.
Security — well, what do you expect? Yes, as things are, PULL.BAT stores an email address in the clear. PMSMTP.CFG stores one only weakly encoded, and and I’ve told you how. So security is ‘none’. Assuming your computer is physically safe, or BIOS passworded, the main risk actually comes from dual booting. No one is going to log into your DOS computer from the outside. It’s not running any background services that can be exploited. I guess if you run some malware it could search the hard drive and upload stuff to somebody. If the computer dual boots with Windows or something, then if your Windows installation is compromised, somebody might be able to run something in the background while you are happily using Windows, and could find the DOS drive and then see the passwords.
I would recommend that any accounts that you set up for DOS emailing are secondary ones. Don’t use the one you use for password recoveries, internet banking and all that. Set one up just for using from DOS.
Very much a note to self. (This is so specific to my messing around on FreeDOS… really just recording it here in case I need to do it again.)
Recently set up Pegasus mail on FreeDOS using pmsmtp as the sending agent. Worked great with GMX mail (which as yet does not demand 2FA). Then set up a few other things, including the correct time zone (TZ variable), and the mail sender stopped working. Specifically, I found that when I set my timezone using the sort of notation that FreeDOS has introduced (eg set TZ=AEST-11AEDT), then this gets used by Pegasus mail to construct the email, and then the mail provider (GMX) does not understand it and sends back an error message. Here is the pmsmtp32 output:
Received: 554-Transaction failed
554-Reject due to policy restrictions.
554 For explanation visit https://postmaster.gmx.net/de/case?c=hi&i=ip&v=1.145.66.107

SMTP host's expected response is missing, here. Sorry.
Mail file(s) still waiting to be sent.
And the page it points to is about nonconformance with RFC 5321 and RFC 5322.
If I change TZ to (say) EST, and make sure the time is not in the future, then the mail sends. So I have had to use a kind of batch file as a wrapper, and then use picosntp to set the time given the time zone:
[mailpull.com is just my binary-fied batch file to pull down the mail. It’s a crude way of obfuscating the password in the clear; not that it matters — the computer is pretty physically inaccessible!]
@echo off
set TZ=EST
c:\net\picosntp\picosntp /q /d5 pool.ntp.org
set startdir=%cd%
c:
cd \net2\pmail
mailpull.com
pmail -u username@gmx.com
cd %startdir%
set startdir=
set TZ=AEST-11AEDT
c:\net\picosntp\picosntp /q /d5 pool.ntp.org
date /d
time /t
So what this does is change the time zone to EST, because nothing is going to complain about a US time zone, but then resets the computer time using picosntp to make sure the time on the email is not in the future (which is also a problem), then we pull down the mail, log into Pegasus mail, write the new mails, which pmsmtp32 sends; then on exit the TZ is reset and the time is reset and then checked.
I should really save the former time zone to a variable and restore it from there, but it’s not like I am going to move the computer to a new time zone.
Back in the 1990s, when email first became a thing for the wider community, for a lot of us in the non-UNIX world, Pegasus Mail was the first email program we used. If you were in UNIX-land, it was pine, elm and mutt and if you were on MSDOS or Windows up to Windows 98, it was quite possibly Pegasus Mail.
The last DOS version I know of is 3.50. The pmail (as we’ll call it) architecture is such that you can think of it as 3 programs.
An agent to pull the email off the server.
A program to manage and edit email — read in the results of the pull, write new emails ready to go out, manage them into folders, handle attachments and so on.
An agent to send the email.
This means that if you (by which I mean not me) are able to create the needed agents. pmail 3.50 can still profitably be used for step 2.
Fred Macall has done just that, and maintained it for years in a valiant and highly successful effort (http://macall.net/). I am assuming you have a working packet driver and the wattcp infrastructure installed; FreeDOS installed in say VirtualBox as per its defaults will usually fulfil this, though I am working on bare metal.
Second, go to http://macall.net/ and grab PMPULL and PMSMTP32 latest versions.
I suggest unpacking all 3 archives in side-by-side
directories, at least for now. My structure is that
I have c:\net2\pmail c:\net2\pmpull and c:\net2\pmsmtp. Eventually, everything we need will be in the pmail folder.
First, get the pull agent to work; once it is working, we can copy pmpull.exe and pmpull.cfg into the pmail folder.
cd into the pmpull folder and unzip the archive
have a look at the docs, then edit the pmpull.cfg file. It contains a lot of really useful comments and examples. In it, you’ll see a lot of lines beginning with # — these are comments. I am leaving them out of what I show you; they are all there in the zip.
If using static IP, you’ll need to specify gateway, nameserver, and all that.
maildir is where the new mail will be dumped (create it to match the entry in the file). pop3host is the POP3 server and its port number (get this from provider website, usually) and pop3sec is the security protocol. The port changes with protocol. If your provider uses 2-factor authentication, you’ll need an app password, and some providers do not provide these, and they won’t work with this approach.
Note that the password is in the clear (it may be your app password), so you don’t want to put this in a batch file with the password included! So it is best to run it manually at the start of your session. The simplest thing to do is probably to copy pmpull.exe and pmpull.cfg into your pmail folder and put that folder in the path; but you could simply cd into your pmail folder at the start of each session.
Once the pull has worked, you will see files in maildir; they will have obscure coded names with CNM extensions.
The CNM files are the new mail files. If you now run pmail, you’ll be able to see them. But first, we have to do some configuring of pmail.
In the pmail folder, run pconfig.exe.
First, choose standalone config and put your mail folder in there. At the least, your new mail folder must match the one in pmpull.cfg, because that tells pmail where to look for new mail.
Second, manage user-defined gateways and create a new one. Put the correct new mail folder in here, and we’ve already seen that new mail is *.cnm, so that is the new mail search mask. Set your outgoing mail folder — this could be a new folder that you create. I’ve used c:\net2\pmail\mailout.
Note that in pmsmtp.cfg and pmpull.cfg, these mail paths must have a trailing backslash!!!!
Filename format must be specified as: ~d~d.MSG
(this is a pmail language, but the key thing is that the sending agent will expect MSG extensions, which is not the default. The ~d~d is code for ‘make up some unique forename’ — remember that DOS file names only have 8 chars!)
Then we set Reply address format to: “~p” <~n>
(Again, this must be exact; it basically constructs the header that the sending agent expects. This is all in the very excellent docs.)
Accept SMTP address = Y
Simple message headers must be ‘Glue’
(Again, this is part of constructing the outgoing mail so that when the sending agent looks for it, it finds what it expects.)
If you save all that and run pmail, you should log into pmail with the email address you’ve set up (you can add it as a command line argument to pmail if you want to save this step routinely — see batch file snippet below), and then look for new mail, if you’ve pulled any down.
You can do some configuring (Preferences — General Settings is useful for working dir, reply names, and sigs).
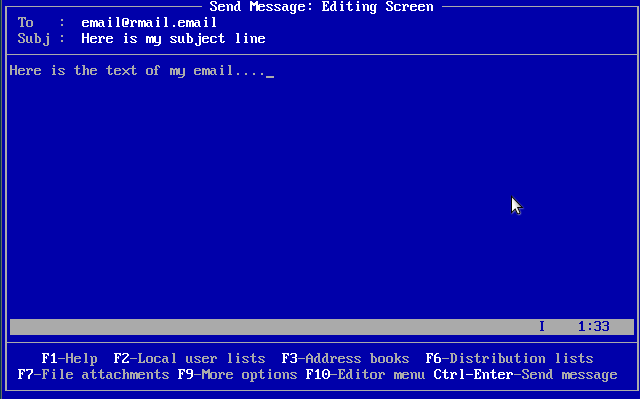
Then you could write a new email and ‘send’ it using Ctrl+Enter
Quit pmail.
In your mailout folder, you should have an msg file, waiting to go; but now we need to configure pmsmtp32. Again, it has pretty useful docs.
The main cfg file is pmsmtp.cfg (in the pmail folder); mine looks like this:
Now, the main trick is getting the b64userid and b64passw fields. For this, we can use pmail itself. (From the docs.) These are your login (email address, usually) and your password, mime encoded, and we can get pmail to do the encoding.
In DOS, type:
copy con pass
YOURPASSWORD^Z<Enter>
That is, we are going to copy from the console (screen) to a file called pass. <Enter> means hit Enter key and ^Z means Ctrl+Z
So you type your password, you DO NOT hit Enter (we do not want an Enter character in the file! It will get encoded and make it wrong). Instead, you type Ctrl+Z to tell DOS to end the input, then hit Enter.
Do the same for your email. Something like:
copy con email
myemail@server.com^Z<Enter>
Now, run pmail.
Create a new message and choose: “‘Send a mail message'”; attach these two files (pass and email), and choose the encoding as Basic Mime.
Ctrl+Enter to exit the attach dialog, and again to send.
Quit pmail.
cd to your mailout folder and you’ll find 3 new files. One is the message, and two are the attachments. At the very end of each of the attachment files (which are pretty self-explanatory) you should see a line like:
aBfhd5gdhej==
this is the mime-encoded password or email. Copy these bits into the cfg file as above where I have put ‘***redacted***’. Note use of double-quote marks.
Note that pmsmtp.cfg has the outgoing mail folder as the maildir variable.
In DOS, we can put pmsmtp32.exe and pmsmtp.cfg into the pmail folder and in there type:
pmsmtp32
and with any luck it will find your queued messages and send them.
Now, it should be possible to pull and send from within pmail. Within pconfig and the gateway config, you can put a send command, which might be basically \path\to\pmsmtp32 if you are allowing the config file to hold your password, or \path\to\mysend.bat if you are using some custom batch file to send (or a COM file if you are using the bat2exe route; see below).
Because pulling the mail needs a plain password, you probably don’t want to do that inside your pmail session, since that would require storing the password in the clear somewhere.
But you can if you want …
So a session would be:
pmpull to get the mail
pmail to read and create
pmsmtp32 to send, run from within pmail if the base64 password is in the cfg file or outside if to have to type it out on the command line.
Now, obviously it is possible to write batch files to run the pull and send commands, but as noted they will have passwords in them — in the clear in one case, and very weakly encoded in the other (strings encoded in base64 will be pretty recognisable to people with a little knowledge of the encoding). If you can be bothered, you might be able to at least protect things from less-expert eyes. For example, there are programs to convert batch files to binary COM files (though sometimes the text within is in the clear); there are executable encoders (netrun21.zip) and compactors (UPX) that might be able to take your binary-fied batch file and remove any human-readable components. If you like writing code, you might be able to write a C program (say) that somehow runs the push or pull program; then if the C source is not kept on the computer and the binary is run through UPX or something … etc.
Of course, these days, we rely on our login password a lot — often our passwords are stored in the browser, there for anyone who can crack our login code. So this method is I guess not as bad for security as it may seem; but because DOS does not have a login manager, if security is an issue, you might want to, if you can, set some kind of boot password in BIOS.
Of course, if someone boots your computer off a live disc/USB, they’ll be able to read any non-encrypted passwords anywhere on you DOS drive (or on a non-encrypted Linux drive for that matter), which means if the box is not physically secured a BIOS password and boot settings that do not permit boot from external media is probably as good as DOS security is going to get.
if we have an obfuscated binary to pull the mail, (call it mailpull.com), and a similar one to send it (but called from within pmail), we might create a pmail.bat and put it in our path (c:\freedos\links in FreeDOS):
@echo off
set startdir=%cd%
cd \net2\pmail
mailpull.com
pmail -u myemail@server.com
cd %startdir%
set startdir=
So this will store the current dir, go to the pmail dir, get new mail, run pmail (which calls the sending agent internally), then exits and takes us back to the directory where we started.
This all assumes you only want to use a single email address. You can set up several gateways within pmail, but if I wanted to run more than one account, I would (cheating, I know) probably just have parallel installations of pmail, with a series of batch files — instead of pmail.bat, I would have gmx.bat gmail.bat and so on, and run them separately; but that all depends on how you use your acounts. I don’t have much crosstalk between the couple I have.
Pegasus Mail still exists and is still being developed as donationware. (pmail.com) The current version for Windows (including 10) is version 4.80 and is at https://download-us.pmail.com/w32-480.exe. Here, I run through brief installation session. This is for GMX, but should be representative of various mail providers — but not all.
First, downloaded and ran the installer. I unchecked desktop icon (I don’t like to have many apps on the desktop) and unchecked using it to open ‘mailto:’ links (since I am testing it out — I have not yet decided whether to use it regularly).
See the note at the end of this post on the architecture of pmail!
On first run, it opened the pmail (as it calls itself behind the scenes) main window, and started a configuration session (wizard) in which it asked for email address, then pop3 server.
Let’s use GMX, which supports application-specific passwords. This would also work for Gmail, using an app password.
Then, it asks for user name (in my case, my email address (pmail might warn you about having an @ in your username; don’t worry) and password. (As noted, if your mail provider needs 2 factor authentication, that is not (yet) in pmail, so you go to the provider web interface and ask for an application-specific password, which is (on Gmail and AOL) a 16-character string.)
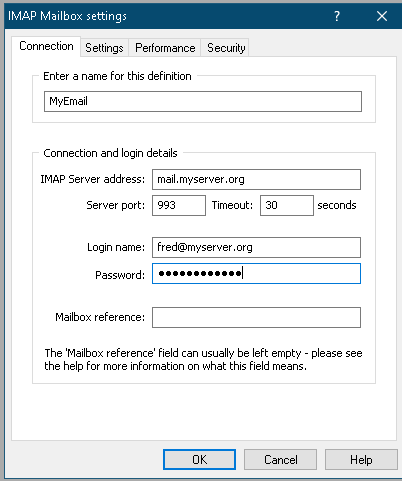
Note that the Tools > Internet Options menu also has an entry for IMAP profiles, which I later used to set up a Gmail account with no problems at all..
SMTP server: mail.gmx.com
The wizard does not do everything we want, so I then went Tools > Internet options > Receiving (POP3) and edited the entry in there.
Server host name: pop.gmx.com
User name: my email address (your username may be something else… but that’s unlikely these days)
Password: <Password>
Server TCP/IP port: 995
Set ‘Delete mail on server…’ to whatever you want
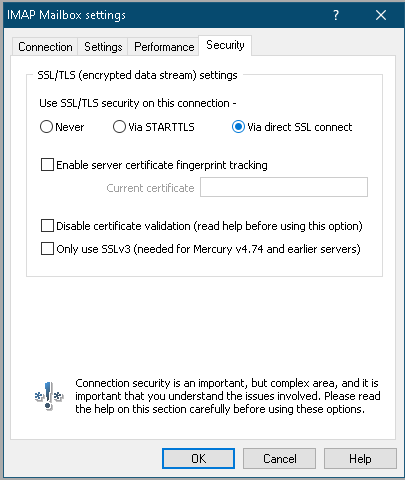
Now went to the Security tab and checked Via Direct SSL Connect (note on the GMX page that it says port 995 is the SSL port; this is the usual correspondence of port and protocol).
On the Download Controls tab, you may want to check Download Only Unread…, and review other settings.
Clicked OK until back to main page.
Now, clicked on the globe of the Earth with an arrow coming down from it. (‘Get your mail from the cloud.’) This grabbed email, and I could then do all the usual email-ish things. Reading, saving, etc; so now … sending.
Tools > Internet options > Sending (SMTP) > edit the entry:
Server host name: mail.gmx.com
Server TCP/IP port: 587
Then in Security tab, checked Via STARTTLS.
Checked ‘Login to the SMTP server…’ and gave username and password. Then reread the screen and instead checked ‘Login to the SMTP server using a POP3…’ (because in my case the details are the same — which is likely) and chose the POP profile established earlier.
(I left the rest alone… YMMV.)
On the front page of the Sending menu, you have options like ‘Send mail at once’ etc. I checked the middle 3 of the 5 boxes. Whatever.
Now, to send, clicked on the pencil and pad icon (top-left), or clicked on a message and clicked reply, and it was all much like you might expect, with a nice editor with a lot of features. I had not checked the send immediately option, so when I had assembled all my emails (that is, written them and clicked ‘Send’ within the editor), I clicked the up arrow and Earth icon to actually send my mail.
If you want to set up a second identity (email account), the simplest thing is to go Tools > Identities then clone the <Default> one and modify it. IMAP is added through a separate menu item (Tools > IMAP profiles), and you then Connect to it and it all seems to work. Although I found how you link a specific IMAP with a specific identity unclear. Managing several accounts I have found non-transparent. In the end I created separate users for the separate email accounts, so that you fire up pmail and it asks for your user ID, then drops you into the appropriate account. More strongly siloed the accounts, which I do not mind. Still learning. The beta version that allows OAUTH2 with Gmail also offers more hand-holding when it comes to user admin.
Note well: you do need to take a little care to make sure that you are sending mail from the identity that you think you are using. There is a drop-down on the default main menu that shows the current identity. All your mail folder for all identities will be visible in the left pane, which does allow for some confusion, in that you might be looking at (say) a gmail folder, but with an identity from another account. The advantages of this are that you can (if you get to know the menus) send from one account and put your copies to self in another, for example; a disadvantage is that you probably do need to think a little more when sending mail, and get in the habit of checking who you are. Pegasus mail does a little less hand-holding than some clients — something you might really like, or not.
In short, Pegasus Mail works perfectly well on Windows 10 as long as your provider can supply POP3 (or IMAP) and SMTP details and you are happy (and allowed) to forego 2-factor authentication, or your provider can supply an application-specific password. This may rule out systems using what is referred to as OAUTH2 methods or which do not provide app passwords. As I understand it, the pmail team is working on modern authentication protocols. But it is a small team! I intend to use the program for a little while, and if I keep it … well, the Pegasus mail front page has a Donate button (update; I decided to pay).
The Gmail OAUTH2 stuff seems to work pretty well, removing the need for an app password with Gmail.
The interface is a little old fashioned, which is to say all the functionality is not hidden behind sleek but meaningless menus. This may well be a feature for many users. I would say Pegasus Mail does put you a little closer to the underlying mail infrastructure, and puts more options in front of you. A regular user can still use it without worrying about all the extra information.
It is also very light and pretty fast. The download is like 13.5 MB. The documentation is very thorough, though some users might find it daunting in places, and frequent references to NetWare do make it look a bit dated. In summary, I guess you could say it is very capable and has a ‘classic’ look!
Pegasus mail, by default, installs to c:\PMAIL. That means that all users who can log into the computer can run it. It also means you need to take care when setting it up if you do not want everybody with a login to be able to read your email. You might need to install the mail folder into your own file space, or (given pmail is only a few MB) just install your own copy of pmail in your own folder.
This architecture is the result of its long history. Back in DOS and early Windows day, there was no logging in, and DOS gave you complete mastery of the whole computer, so it was very much ‘my’ computer. Pmail still works that way. It kind of assumes it’s your computer and no one else is going to use it. You can work around that, but you must choose to do so.