I want to set up Pegasus Mail (‘PMAIL’) to use Gmail on one of my computers because the computer is a bit old and using a heavy application like Thunderbird or Firefox is a bit slow. The Pegasus Mail setup wizard holds your hand through this, and makes it pretty easy. And I don’t think I needed admin, either.
From previous experience, if I let it install to C:\PMAIL, it will put my mail in there as well, and anyone else who logs into this box will be able to see my mail, or at least see the folder it is in. So I installed it into:
C:\Users\USERNAME\installs
I do note that this folder path has no spaces in it. I don’t know how PMAIL plays with paths with spaces, but I chose to avoid them.
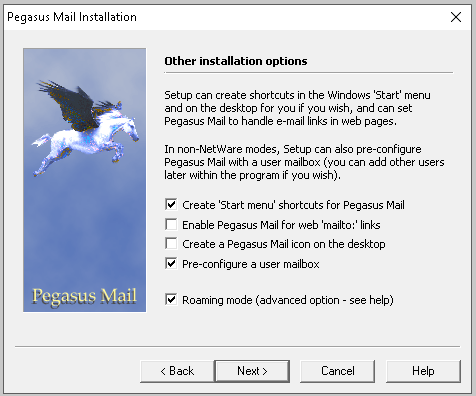
I don’t want it to deal with ‘mailto:’ links (yet), and I don’t want a desktop shortcut, so I unchecked these options. The Roaming option was not be relevent here.
It ran and the installer exited.
Now, I could run it from the Start menu. I just ran ‘Pegasus mail’ (no admin). The account setup wizard started.
The dialog said:Do you use Gmail…? and gave me a single ‘Gmail’ button to push. I pushed it!
OK!
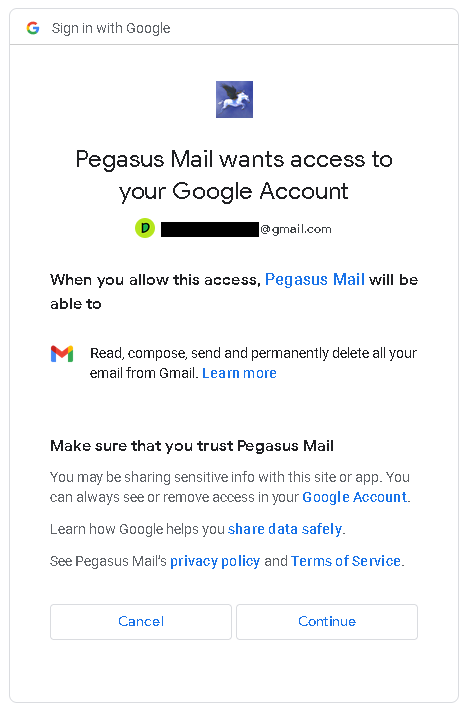
I put in my Gmail address, did not mess with any defaults, and clicked OK. It then gave me a dialog that told me we were about to ask Google for permission to use Pegasus Mail with Gmail. I clicked Transfer and logged in.
And… a window opened in my browser, taking me to the Gmail sign-in windows and then back to PMAIL.
OK, now I’d rather use IMAP than POP3, so in PMAIL I go Tools > Internet options and Receiving (POP3) and disable that profile. The installer has also created IMAP, and I want to use that in preference. If you are not careful with your settings, POP will download all your email off the server and delete it from the server! There are options to set in PMAIL to prevent that, but IMAP is generally to be preferred anyway. POP was rather designed on the assumption that you’ll only access your email from this computer, using this software, and although the settings let you avoid that assumption, and POP is fine really, IMAP is more modern and is generally to be preferred if available (as I understand it).
Also in Tools > Internet options, I add my email address to the General tab.
Now, I click on the icon of the Earth with an arrow coming out of it.
Nothing.
Restart PMAIL. OK, can I send a mail? Seems I can. OK, maybe I have to enable IMAP explicitly. Duh! When I go Tools > IMAP profiles, I see a ‘Connect’ button. Press that. It is working. I can see in the status bar that PMAIL is grabbing lots of folders, and now they appear in the PMAIL window!
That was easy enough.
Click Done.
Great. Looks excellent. Last step was to pin the PMAIL icon to the taskbar before exiting.
Now, PMAIL has a lot of configuration options, many of which are not available in other software. It works out of the box, but you may want to spend some time hunting around and looking at your other options. Its mail filter is especially powerful.
Pegasus Mail still exists and is still being developed as donationware. (pmail.com) The current version for Windows (including 10) is version 4.80 and is at https://download-us.pmail.com/w32-480.exe. Here, I run through brief installation session. This is for GMX, but should be representative of various mail providers — but not all.
First, downloaded and ran the installer. I unchecked desktop icon (I don’t like to have many apps on the desktop) and unchecked using it to open ‘mailto:’ links (since I am testing it out — I have not yet decided whether to use it regularly).
See the note at the end of this post on the architecture of pmail!
On first run, it opened the pmail (as it calls itself behind the scenes) main window, and started a configuration session (wizard) in which it asked for email address, then pop3 server.
Let’s use GMX, which supports application-specific passwords. This would also work for Gmail, using an app password.
Then, it asks for user name (in my case, my email address (pmail might warn you about having an @ in your username; don’t worry) and password. (As noted, if your mail provider needs 2 factor authentication, that is not (yet) in pmail, so you go to the provider web interface and ask for an application-specific password, which is (on Gmail and AOL) a 16-character string.)
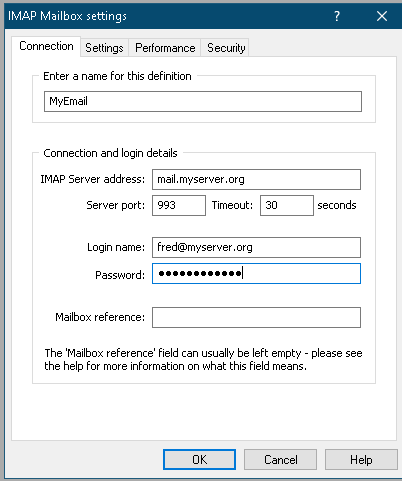
Note that the Tools > Internet Options menu also has an entry for IMAP profiles, which I later used to set up a Gmail account with no problems at all..
SMTP server: mail.gmx.com
The wizard does not do everything we want, so I then went Tools > Internet options > Receiving (POP3) and edited the entry in there.
Server host name: pop.gmx.com
User name: my email address (your username may be something else… but that’s unlikely these days)
Password: <Password>
Server TCP/IP port: 995
Set ‘Delete mail on server…’ to whatever you want
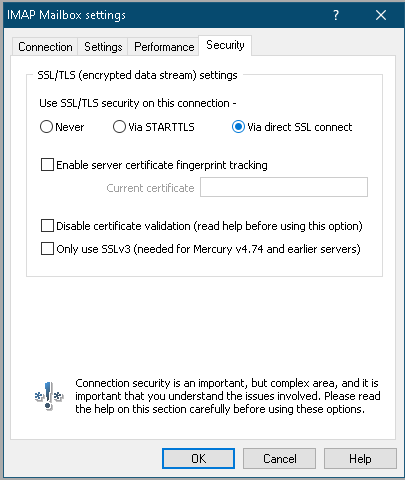
Now went to the Security tab and checked Via Direct SSL Connect (note on the GMX page that it says port 995 is the SSL port; this is the usual correspondence of port and protocol).
On the Download Controls tab, you may want to check Download Only Unread…, and review other settings.
Clicked OK until back to main page.
Now, clicked on the globe of the Earth with an arrow coming down from it. (‘Get your mail from the cloud.’) This grabbed email, and I could then do all the usual email-ish things. Reading, saving, etc; so now … sending.
Tools > Internet options > Sending (SMTP) > edit the entry:
Server host name: mail.gmx.com
Server TCP/IP port: 587
Then in Security tab, checked Via STARTTLS.
Checked ‘Login to the SMTP server…’ and gave username and password. Then reread the screen and instead checked ‘Login to the SMTP server using a POP3…’ (because in my case the details are the same — which is likely) and chose the POP profile established earlier.
(I left the rest alone… YMMV.)
On the front page of the Sending menu, you have options like ‘Send mail at once’ etc. I checked the middle 3 of the 5 boxes. Whatever.
Now, to send, clicked on the pencil and pad icon (top-left), or clicked on a message and clicked reply, and it was all much like you might expect, with a nice editor with a lot of features. I had not checked the send immediately option, so when I had assembled all my emails (that is, written them and clicked ‘Send’ within the editor), I clicked the up arrow and Earth icon to actually send my mail.
If you want to set up a second identity (email account), the simplest thing is to go Tools > Identities then clone the <Default> one and modify it. IMAP is added through a separate menu item (Tools > IMAP profiles), and you then Connect to it and it all seems to work. Although I found how you link a specific IMAP with a specific identity unclear. Managing several accounts I have found non-transparent. In the end I created separate users for the separate email accounts, so that you fire up pmail and it asks for your user ID, then drops you into the appropriate account. More strongly siloed the accounts, which I do not mind. Still learning. The beta version that allows OAUTH2 with Gmail also offers more hand-holding when it comes to user admin.
Note well: you do need to take a little care to make sure that you are sending mail from the identity that you think you are using. There is a drop-down on the default main menu that shows the current identity. All your mail folder for all identities will be visible in the left pane, which does allow for some confusion, in that you might be looking at (say) a gmail folder, but with an identity from another account. The advantages of this are that you can (if you get to know the menus) send from one account and put your copies to self in another, for example; a disadvantage is that you probably do need to think a little more when sending mail, and get in the habit of checking who you are. Pegasus mail does a little less hand-holding than some clients — something you might really like, or not.
In short, Pegasus Mail works perfectly well on Windows 10 as long as your provider can supply POP3 (or IMAP) and SMTP details and you are happy (and allowed) to forego 2-factor authentication, or your provider can supply an application-specific password. This may rule out systems using what is referred to as OAUTH2 methods or which do not provide app passwords. As I understand it, the pmail team is working on modern authentication protocols. But it is a small team! I intend to use the program for a little while, and if I keep it … well, the Pegasus mail front page has a Donate button (update; I decided to pay).
The Gmail OAUTH2 stuff seems to work pretty well, removing the need for an app password with Gmail.
The interface is a little old fashioned, which is to say all the functionality is not hidden behind sleek but meaningless menus. This may well be a feature for many users. I would say Pegasus Mail does put you a little closer to the underlying mail infrastructure, and puts more options in front of you. A regular user can still use it without worrying about all the extra information.
It is also very light and pretty fast. The download is like 13.5 MB. The documentation is very thorough, though some users might find it daunting in places, and frequent references to NetWare do make it look a bit dated. In summary, I guess you could say it is very capable and has a ‘classic’ look!
Pegasus mail, by default, installs to c:\PMAIL. That means that all users who can log into the computer can run it. It also means you need to take care when setting it up if you do not want everybody with a login to be able to read your email. You might need to install the mail folder into your own file space, or (given pmail is only a few MB) just install your own copy of pmail in your own folder.
This architecture is the result of its long history. Back in DOS and early Windows day, there was no logging in, and DOS gave you complete mastery of the whole computer, so it was very much ‘my’ computer. Pmail still works that way. It kind of assumes it’s your computer and no one else is going to use it. You can work around that, but you must choose to do so.
I want to read a secondary account from Alpine. Below lets me do that — though not send email from it… If we go here, https://support.gmx.com/pop-imap, we can get the info.
First, activate it in account settings by logging on through the web portal at https://www.gmx.com/. To do that:
Log in
Go to email tab
Click ‘Settings’ — bottom left of screen, at least on my version
Click POP3 & IMAP on the menu on the left
Check ‘Enable access to this account via POP3 and IMAP’ and hit ‘Save’
Now, I have Alpine set up to send from Gmail, so I am only going to set up the extra collection. Other posts and resources on the internet talk about sending email from Alpine. This post includes some settings in the Config menu that you should use.
In Alpine main menu, go (S)etup then co(L)lections then (A)dd collection
Nickname — GMX, most likely
Server details from the page we opened above — this is the incoming server: imap.gmx.com/ssl/user=username@gmx.com
Hit Enter — it should ask for your password; it may or may ask if you want it saved, depending on whether you’ve set Alpine up to do so
Leave other fields blank
Ctrl+x to save, y to exit and save changes
Use $ to shuffle collection order
Exit to main menu
Go to folder (L)ist
Choose the mail account and folder you want and bingo!
Not bad.
Note that this only sets up to read email from GMX. If I go to send and email or reply to one in the GMX folder, Alpine uses the defined sending server, which I have set up to be Gmail. This can be overcome by using profiles, which I can’t be bothered with. If and when I set that up, that will be another post.