Virtual machine on Windows 11 without admin

In my ongoing scheme to get as much functionality on Windows as a lack of admin access will give me, here is a path to installing a Linux VM, which you can administer fully, into Windows 11 in which you don’t have admin rights.

Downloaded the QEMU Windows 11 installer. I used wget, but a browser or whatever is fine:

wget https://qemu.weilnetz.de/w64/2023/qemu-w64-setup-20230822.exe

Unzipped the exe (right-clicked on the file, chose something like ‘open with 7zip’ or similar) — that seemed to work … copied all the content into some folder.

C:\Users\darren\installs\QEMU

Added this to the path for my account. Then  opened a regular CMD window (not admin window — I am not allowed too…). Went to the folder where I want the VM to live (created it first if need be):

cd C:\Users\darren\installs\slitaz

Made a disk — that is, created the drive for the VM:

qemu-img create -f qcow2 slitaz-image.img 20G

Formatting 'slitaz-image.img', fmt=qcow2 cluster_size=65536 extended_l2=off compression_type=zlib size=21474836480 lazy_refcounts=off refcount_bits=16

Got the install media —  I have chosen SliTaz Linux because it is relatively low in system requirements, and installing in user space means some speed-ups that would otherwise be on offer (like hardware acceleration, that’s a buzzword that comes to mind) are not possible.

wget http://mirror.slitaz.org/iso/rolling/slitaz-rolling.iso

I suggest you view this page:

View at Medium.com

Boot with some instructions:

qemu-system-x86_64 -m 2048 -boot d -smp 2 -hda slitaz-image.img -cdrom slitaz-rolling.iso

What doe this mean?

-m 2048 = machine has 2 GB of RAM
-boot d = boot off the CD drive
-smp 2 = model a 2 processor machine
-hda slitaz-image.img = the hard disk to use
-cdrom slitaz-rolling.iso = what to put in the virtual CD drive

the Slitaz disc boots and we get the live disc desktop.

Some issues with mouse integration, let’s forget that for now. I can right-click in middle of GUI window and choose to launch application, and run xterm and then run tazpanel.

Then clicked on head and shoulders icon and became root; then chose Installation > Install SliTaZ from the panel top menu.
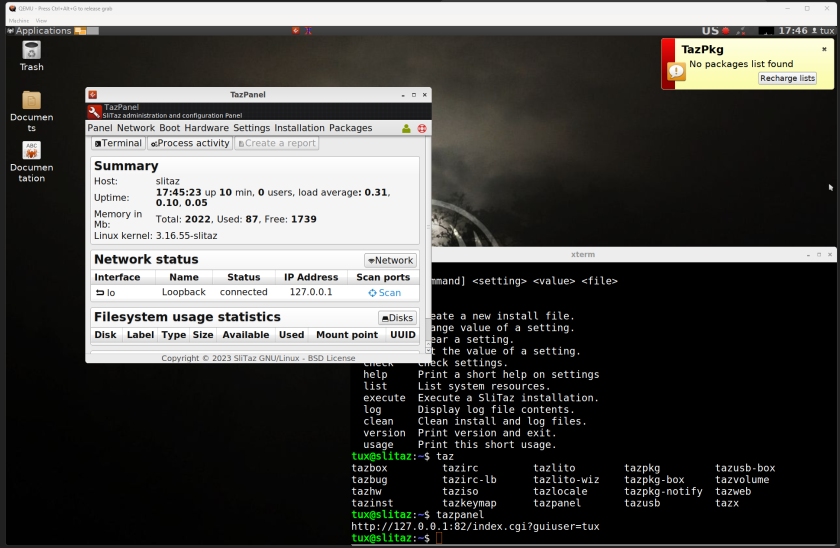
Ran GParted and made the partitions — all as per normal installation (a few GB of swap, and a root partition).

Filled out the details in the installer and off it went.

Note: SliTaz doe not like spaces in passwords. Make sure you install a bootloader — this will not be a shared disk, so that means I just chose the first option.

Reboot! That means shutdown the machine, then run it using a different QEMU command, because we don’t want to boot off the CD now.

qemu-system-x86_64 -m 2048 -boot c -smp 2 user -hda slitaz-image.img

In my case, I have not got -nic options in the boot command, because the defaults worked. From within the machine, I can ping 8.8.8.8, browse the web, and update SliTaz and install software.

Mouse is a bit flaky, and have to try a couple of times to boot it sometimes, but on the whole not bad. An admin-able machine inside a Windows machine that I am forbidden to admin!

‘kay

Viewing PostScript on Windows 10 and 11 using IrfanView, without admin

Let’s say you’re using Windows. Let’s say you want to view some PostScript or encapsulated PostScript and you do not have administrator privileges. You could install the Windows version of Evince. You could use gv, Evince or some other tool via Cygwin installed without admin.

An alternative (there are many) is to install IrfanView and its plugins and set it up to use GhostScript. First, we need to install GhostScript without admin. I talked about this once before, but  these days the installer is 7zipped instead of zipped.

Downloaded:

 s10020w64.exe

from https://ghostscript.com/releases/gsdnld.html. Renamed to have a 7z extension.

 s10020w64.7z

The can double-click the file in Windows Explorer and it will open as an archive; can save contents of archive to some folder. Let’s say it was:

C:\Users\darren\installs\gs10

Now, install IrfanView, also in userspace, and then install the plugins. Can use the simple Windows installers for both. For IrfanView, choose ‘For current user only’ and then specify a user-writeable folder, say

C:\Users\darren\installs

The installer will create the IrfanView folder inside that one. When running the plugin installer, tell it where IrfanView is. In this case:

C:\Users\darren\installs\IrfanView

And then it is installed, all ready to use as a useful image viewer (and for some processing etc).

Run IrfanView. Go:

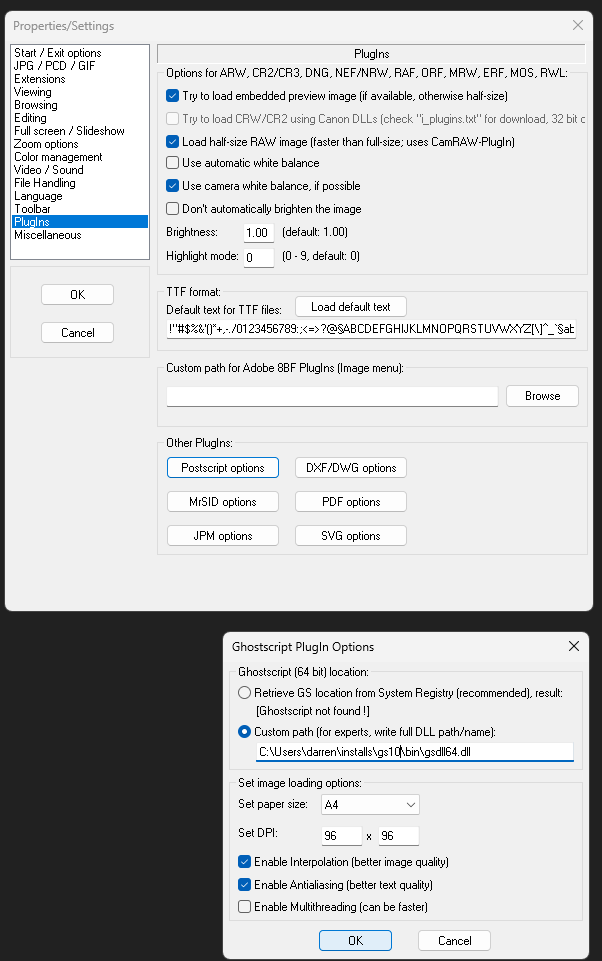
Options > Properties/Settings > Plugins > PostScript options > Custom path > copy full path to GS DLL from file explorer and paste here

For example, in this case the full path to the DLL , including the DLL itself, is:

C:\Users\darren\installs\gs10\bin\gsdll64.dll

Set other values as needed — eg paper size and so on.

Select Ok > OK

You can add GS to your path if you like.

Done. Now can open EPS and PS in IrfanView as you would PNG or JPG etc.

Very good for EPS files.

Escher.ps - one of the standard postscript examples that comes with ghostscript

Simple PostScript viewer on Windows 11

So — no admin rights; I want a PostScript viewer; my old go-to tool, Gsview, is no longer maintained.

Evince, the viewer from the Linux Gnome desktop, to the rescue!

https://evince.en.uptodown.com/windows/download

Simply run the installer, as for ‘advanced’ and choose to install for user. Then does not need admin rights. Installs the binary to something like:

C:\Users\USERNAMDE\AppData\Local\Apps\Evince-2.32.0.145\bin>

and this folder can be added to your path or you can put a batch file that calls evince in a folder that is already in your path.

I have a folder c:\User\USERNAME\installs\bin in my path, so I put evince.bat in there:

C:\>type \Users\USERNAME\installs\bin\evince.bat

C:\Users\USERNAME\AppData\Local\Apps\Evince-2.32.0.145\bin\evince.exe "%*"

And all good! Very nice viewer for several file types, including PostScript and encapsulated PostScript.

Seems like you might want to put the installer file somewhere permanent before running it. Seems odd, but when I ran the shortcut after deleting the installer, it complained that it could not find the installer…!

Inkscape cannot find Ghostscript

Wanted to open a PS/EPS in Inkscape, but got this error message about how Inkscape could not find Ghostscript..

Now, I don’t have admin rights (work computer), so I downloaded the GS installer (version 10.x for 64-bit Windows) and rather than running it, I unzipped it into:

C:\Users\USERNAME\installs\gs10

and added

C:\Users\USERNAME\installs\gs10\bin

and

 C:\Users\USERNAME\installs\gs10\lib

to my personal path. Then I created 2 new environment variables (personal ones, no need for admin):

GS=gswin64

and

GS_LIB=C:\Users\USERNAME\installs\gs10\lib

Then ran Inkscape and now it can find the GS binary… I can choose built-in or Poppler import and all is well!

I can also now use GS from the command line if I want to.

Windows without admin rights…

Yay,  new work computer. Boo, Windows. Boo, no admin rights.

But

Cygwin

Install Cygwin via running the setup program in the CMD prompt:

setup-x86_64.exe -B -d

then use the same (maybe wrapped in a shortcut) to update it, and we can use it without admin. That gives all the software within Cygwin, which is a lot, including powerful GUI tools as well as the command line  (Inkscape, for example).

Java

OpenJDK zip file can just be unzipped in any folder (I have it in C:\Users\darren\installs\jdk-19.0.2) then you can add its bin to your path.

crgrep

crgrep needs Java, so once OpenJDK is in place, can be installed in much the same way, with JAVA_HOME created to point to where you want it.

pdftk

pdftk was a bit trickier, but if you have Java, then  put the jar file from https://gitlab.com/pdftk-java/pdftk into some folder, then put a small batch file in your path:

java -jar c:\Users\darren\installs\pdftk\pdftk-all.jar %*

%* means ‘all command line args’, so this basically just works like pdftk.

I put the Cygwin /bin folder on the END of my windows path, always on the end so if I am running in Windows nothing gets gazumped. I also go into the Cygwin bin folder and copy find to gfind, so I can use Windows native find and ‘gfind’ for find at the Windows prompt.

Of course I could install a bunch of portable Apps, and I will if I need them.

Inkscape on Windows without admin

More Windows w/o admin

Downloaded the 7z from https://inkscape.org/release/inkscape-1.2.2/windows/64-bit/compressed-7z/dl/

Unzipped it so there is now a folder in:

C:\Users\darren\installs\inkscape-1.2.2_2022-12-09_732a01da63-x64

Now, in my bin folder (which is in my path), make inkscape.bat:

start C:\Users\darren\installs\inkscape-1.2.2_2022-12-09_732a01da63-x64\bin\inkscape %*

And so I can launch it any way I want. All good.


LibreOffice on Windows without admin

LO w/o admin; download the installer, and use msiexec to run it from the command line (regular CMD prompt):

msiexec /a LibreOffice_7.5.4_Win_x86-64.msi

Choose your folder, then let it install. Then download and install the help pack in exactly the same way.

msiexec /a LibreOffice_7.5.4_Win_x86-64_helppack_en-US.msi

I chose to use:

C:\Users\darren\installs\LO

So the executable files are in

C:\Users\darren\installs\LO\program

So I added this to my Windows path. That allows me to run it from the command line, which is handy for LibreOffice.

VPN and Samba on Linux — easier than I expected

I have the server.ovpn file that OpenVPN GUI reads in and uses on Windows. I’d like to use a Linux client. I am running Debian.

First, we use NetworkManager (installed by default unless you did a minimal, customised installation). I install network-manager-openvpn, openvpn, resolvconf, network-manager-openvpn-gnome (though I am using the MATE desktop), samba and cifs-utils and remmina and its RDP plug-in, and for good measure openvpn-systemd-resolved — not 100% sure I need them all (and some are not relevant for this specific post), but …

$ sudo systemctl restart networkmanager

(This makes sure NetworkManager knows all these new toys have been installed.) I used openvpn from the command line to make sure I could make a connection:

$ sudo openvpn --config path/to/server.ovpn

and I could see machines on the VPN (for example, I could ping the server), so that was good. I knew it could work.

Then, went to NetworkManager in the MATE status bar and asked for a new VPN connection, OpenVPN compatible, using a saved configuration, and browsed to my ovpn file. Accepted all defaults and saved the connection, then chose it; was pleasantly surprised when it worked immediately.

Now, to mount the file shares. Ran caja (nautilus if you use gnome) and File > Connect to server > Chose Windows Share as the type, then put the server name (well, IP4 address, but a name would probably have worked as well or better) in the server box. Put the folder in the folder box (with leading /), domain (workgroup in Windows lingo) in its box, then username and password. Checked ‘make a shortcut’ and gave it a name; that also worked out of the box (files showed up in caja), so most of the functionality is there.

A few tips.

  • If you ever have to log into a Windows desktop or other account with something like “COMPANY\username” then COMPANY might work as a domain in the caja connection.
  • Don’t enter the folder and server like \\server\folder like you would in Windows — put server in one box and folder in the other.
  • Using an explicit IP4 address (123.234.345.345) might work but the server hostname is generally to be preferred; but I find that sometimes one works, sometimes the other, so you can try both. Server IP addresses are usually pretty stable — unlikely to be allocated by DHCP!
  • Most ovpn files contain the options needed in the top section. In my case, this meant that I did not do any config changes, just accepted what the saved config imported into NetworkManager. Maybe I was lucky …?
  • Where you would find the mounted folders in the Linux file system can be tricky. Some advice says ~/.gvfs, some ~/.cache/gvfs, some put the files in the /run tree. Given that we have not used superuser to do any of this, I’d expect the files to be in your personal file space, but YMMV. You might have to hunt around for the mount point.

Once you have the VPN working, you may be able to use RDP to work on a remote computer, as well as access files as I have done here.

Does not need sudo or root or superuser or whatever you want to call it.