VPN and Samba on Linux — easier than I expected

I have the server.ovpn file that OpenVPN GUI reads in and uses on Windows. I’d like to use a Linux client. I am running Debian.

First, we use NetworkManager (installed by default unless you did a minimal, customised installation). I install network-manager-openvpn, openvpn, resolvconf, network-manager-openvpn-gnome (though I am using the MATE desktop), samba and cifs-utils and remmina and its RDP plug-in, and for good measure openvpn-systemd-resolved — not 100% sure I need them all (and some are not relevant for this specific post), but …

$ sudo systemctl restart networkmanager

(This makes sure NetworkManager knows all these new toys have been installed.) I used openvpn from the command line to make sure I could make a connection:

$ sudo openvpn --config path/to/server.ovpn

and I could see machines on the VPN (for example, I could ping the server), so that was good. I knew it could work.

Then, went to NetworkManager in the MATE status bar and asked for a new VPN connection, OpenVPN compatible, using a saved configuration, and browsed to my ovpn file. Accepted all defaults and saved the connection, then chose it; was pleasantly surprised when it worked immediately.

Now, to mount the file shares. Ran caja (nautilus if you use gnome) and File > Connect to server > Chose Windows Share as the type, then put the server name (well, IP4 address, but a name would probably have worked as well or better) in the server box. Put the folder in the folder box (with leading /), domain (workgroup in Windows lingo) in its box, then username and password. Checked ‘make a shortcut’ and gave it a name; that also worked out of the box (files showed up in caja), so most of the functionality is there.

A few tips.

  • If you ever have to log into a Windows desktop or other account with something like “COMPANY\username” then COMPANY might work as a domain in the caja connection.
  • Don’t enter the folder and server like \\server\folder like you would in Windows — put server in one box and folder in the other.
  • Using an explicit IP4 address (123.234.345.345) might work but the server hostname is generally to be preferred; but I find that sometimes one works, sometimes the other, so you can try both. Server IP addresses are usually pretty stable — unlikely to be allocated by DHCP!
  • Most ovpn files contain the options needed in the top section. In my case, this meant that I did not do any config changes, just accepted what the saved config imported into NetworkManager. Maybe I was lucky …?
  • Where you would find the mounted folders in the Linux file system can be tricky. Some advice says ~/.gvfs, some ~/.cache/gvfs, some put the files in the /run tree. Given that we have not used superuser to do any of this, I’d expect the files to be in your personal file space, but YMMV. You might have to hunt around for the mount point.

Once you have the VPN working, you may be able to use RDP to work on a remote computer, as well as access files as I have done here.

Does not need sudo or root or superuser or whatever you want to call it.

Grabbing and compressing CSV files from a Samba drive

You will have a better way to do this, no doubt, but after various unhelpful errors and incomplete files, this is what worked for me.

I connected to the VPN then mapped the drive in Windows File Manager (let’s say to H:), then opened a prompt that let me use Unix tools (eg Cygwin, so the drive is now at /cygdrive/h).

I wanted to hoe through a file tree and make an archive containing all the CSV files. zip should be able to do this directly, but there was some problem — it kept saying some files were empty, and others had permission problems.

I guessed maybe it was to do with Samba, so I did something much cruder, but which worked.

(1) Get a list of all the files, including paths:

First, go to a scratch directory in Cygwin:

$ cd
$ mkdir scratch
$ cd scratch

Then get the list and write it to a file:

$ find  /cygdrive/h/path/to/filespace/of/interest -iname *.csv > csv-files

(2) Use Vim to edit the resulting file so each row is a copy command, like this:

cp "/cygdrive/h/path/to/filespace/of/interest/some-subdirectory/fileXXX.csv" .

This is actually pretty simple. Each line in the output list of files from find needs to  be prefaced by cp " and followed by " ..

Since ^ is the start of line and $ the end of line (in Vim-speak), we can use a couple of Vim commands, something like:

:%s/^/cp \"/
:%s/$/\" ./

(3) Run the file to copy out the CSV files:

$ bash csv-files

(they all have unique names, so this will be fine).

(4) Some have strange permissions, so fix:

$ for f in *.csv ; do chmod a+rwx "$f" ; done

(5) Zip them up.

$ zip csv.zip *.csv

And then I could send off the zip file to whoever wanted it.

OpenVPN and caja and Samba

Note to self.

In an X term, start OpenVPN:

$ sudo openvpn --config /home/username/path/to/configfile.ovpn

Once it connects, Ctrl+Z and then:

$ caja  smb://192.168.123.56/folder

For some reason, double-clicking on folders does not work, but right-click and choosing Open does.

Can then navigate to wherever is needed and copy files back and forth as if local.

If using the text client, after Ctrl+Z:

smbclient --socket-options='TCP_NODELAY IPTOS_LOWDELAY SO_KEEPALIVE SO_RCVBUF=131072 SO_SNDBUF=131072' -t 60 \\\\192.168.123.56\\folder -U remoteusername

Then once in, issue:

iosize 16384

These settings seem to help with transferring big files. The extra control over the connection relative to the caja connection can prove useful and more stable when your network is flaky.

I’m beating out a samba


OpenVPN plus samba on Linux, including a GUI

I want to mount a samba share on a Linux box. And I don’t really know what I am doing. Here’s what I did do. First, installed the VPN software and started the VPN.

$ sudo apt-get install openvpn resolvconf

$ sudo openvpn --config openvpn_config_file.ovpn

The file ‘openvpn_config_file.ovpn’ was provided by my IT support people and includes keys and configuration information.

Then tested it on command line:

$ smbclient \\\\server\\service_on_server -U username_on_server

This needs explanation.

‘username_on_server’ is just that — my username on the server I am logging in to, not on the local machine. The -U option just tells it who I am so it will then prompt me for the password I use to log into the server.

The four backslashes? On the Linux command line, you need to enter a backslash as an escaped character. And the escape character is a backslash, so ‘\\’ gives you a single backslash. The above command on Windows would look like the next example, because you don’t need to escape the backslashes. This might look a bit more familiar if you’ve mapped a network drive on Windows:

C:\> smbclient \\server\service_on_server -U username_on_server

I’m gong to limit myself to basic file transfer, so ‘service_on_server’ is often just another way of saying a folder. For example, if you share a folder called ‘group’ with your collaborators, that might be the service name. The service name does not have to be the folder name and you might need to find out from IT support what needs to be typed here.

‘server’ is often the computer. Again, it may not be, but for my purposes it is. When I run the VPN, it allocates IP addresses to the computers/servers on the inside of the VP network, and I use that as the server ID, so the command might look like:

$ smbclient \\\\123.456.78.9\\folder_on_server -U username_on_server

Anyway, once you log in, you can type ‘help’ to get a list of commands:

$ smbclient  \\\\123.456.78.9\\groups -U username
WARNING: The "syslog" option is deprecated
Enter username's password:
Domain=[DomainName] OS=[Windows Server OS Version] Server=[Windows Server Version]
smb: \> help
?              allinfo        altname        archive        backup
blocksize      cancel         case_sensitive cd             chmod
chown          close          del            dir            du
echo           exit           get            getfacl        geteas
hardlink       help           history        iosize         lcd
link           lock           lowercase      ls             l
mask           md             mget           mkdir          more
mput           newer          notify         open           posix
posix_encrypt  posix_open     posix_mkdir    posix_rmdir    posix_unlink
posix_whoami   print          prompt         put            pwd
q              queue          quit           readlink       rd
recurse        reget          rename         reput          rm
rmdir          showacls       setea          setmode        scopy
stat           symlink        tar            tarmode        timeout
translate      unlock         volume         vuid           wdel
logon          listconnect    showconnect    tcon           tdis
tid            logoff         ..             !
smb: \>

If you have ever used ftp or sftp or any of their variants, it is much the same. You can cd around inside the server, lcd to change directories on the local machine, and get and put files. Those are the main commands.

OK, that works. There’s our ‘minimal viable product’. But what about GUIs? People like GUIs, so let’s try one more thing. There’s a GUI front end for samba called smb4k. It’s not the only one, but it’s the one I’m running with.

$ sudo apt-get install smb4k khelpcenter

$ smb4k

(I ran this with the VPN software already running in the background.)

Clicked ‘Open Mount Dialog’ button (or Ctrl+o or Network → Open Mount Dialog).

Entered the information like this, and checked bookmark’:

Screenshot of the Mount Share dialog in smb4k, showing the server and service and user information.
This is what to put in the UNC Address field. The ‘username@’ on the front is optional.

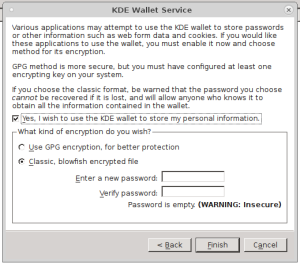
It then asked about using the KDE wallet and GPG. I chose ‘classic blowfish’ and created a password.

Screenshot of the dialogue, showing where to choose the security options and then enter the password
The ‘set password’ dialogue.

It then asked for that same password and a login dialogue to log in to the server came up. Here I put the server password and …

Success!

Clicked on the item in the list of mounted shares and it opened in my default file manager, so now I have a GUI to browse the networked drive.

So there we have it. From ignorance to browsing a samba network drive using caja or whatever in not that long.

……..