EP44 and an FTDI USB to serial convertor to print from Windows 10

Finally  got a CHIPI-X10 instead of some cheap knock-off of something else. Works on the Sipix printer. Now, can I get it to print to the Brother EP44 — which, when  I tried the cheap knock-off, actually started behaving funny.

Note: Once I figured out how to print to the EP44 using the FTDI, I tried the same config using a cheapo cable (CH340 chip), and was able to get that to work. Minimising the receive/transmit buffer size seemed to work again. The cheapo cable had baud settings as low as 75, which is in its favour. So the message seems to be that the cheap cable can work, at least on Windows, but you have to get the settings right and you have to go beyond the documentarian when working on obscure old hardware. Experimenting is tricky — I worry about ruining equipment. And the cheap cable does seem flakier — printer does some funny behaviour…

First, I’ll try using the hardware serial port on another machine, to check the printer and the printing method, then I can try the dongle.

OK, hardware port on Linux and it prints.

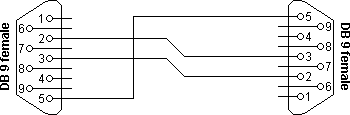
Now, plug CHIPI into Windows 10 machine, then null modem cable into CHIPI then DE9 to DB25 adapter into null modem then that into the EP44.

Set EP44 to 300 baud, 7 bit, even parity.

Try to add it using Windows Printer dialog.

Using Device Manager, our FTDI unit has provided us with COM2.

We can set baud (say 300 — the smallest the FTDI will cope with), data length and so on to match the printer, and set Xon/Xoff to on, as the EP44 documentation suggests; but the data outstrips the printer and it does not print the whole document. It’s like the Xon/Xoff stuff is not working. Cannot go down to 75 or 110 baud — the printer supports these, but they are too old and slow for a modern serial port to support.

Eventually fixed that too. Here is my batch file to set the port to handshake properly — can then print from the CMD.EXE command line (probably PowerShell, but I would not know) by typing or copying the file to the port:

REM This seems to set the FTDI COM2 port to 
REM print with effective handshaking.
REM May need to make sure files have EOL that meshes
REM with what the printer expects.
REM unix2dos or dos2unix can help here.
REM If printer is expecting CR+LF, need DOS line endings.
REM Once the port is set up, and the printer to match, simply:

REM type filename.txt > com2:

mode com2: baud=300 parity=e data=7 stop=1 to=on xon=on odsr=off octs=off dtr=hs rts=hs idsr=off

I found that the transit got ahead of the printer and documents would be incomplete. if I wanted to print the whole Windows printer test page, I could only do that if I used these settings, then went to Device Manager to reduce USB transfer sizes to the minimum (64 bytes). So here is the Windows printer test page. Seems funny how many drivers it needs:

And I can also print (text) from Windows applications, like Notepad, suggesting that the EP44 is perfectly usable with Windows 10 in 2021! Not bad for a serial thermal portable typewriter/printer from 1984 or 1985!

The saga does not always continue

Brother EP44 as Linux serial terminal

Once upon a time, computers were enormous things that you used via a terminal on which the output device was a printer — a remote typer, a teletype. A TTY. This is long gone apart from computing museums. But it is interesting — if not useful — to discover that a battery-powered typewriter from the mid-80s can be used, today, in 2021, as a paper-based terminal for modern Linux. In fact, you really ought to look at this or this or this for something much more exotic. (For example, it can be a useful terminal for a headless single board computer.)

The EP44 is an electronic typewriter that uses a thermal print head to print on thermal paper or to transfer thermal-transfer ink to regular paper, if you put a ribbon cassette in it. (These cassettes are now rare and expensive, so thermal paper — usually as fax rolls — is the best solution.)

Most interestingly, the typewriter also includes a 3500-character memory, a 16-character LCD display, and a DB-25 RS232 port, capable of communication at 75, 110, 300, 600 and 1200 baud. Here’s another related link. Not sure about this one.

The main purpose of the RS232 connection is to use the machine as a printer. This is relatively straightforward, especially if you have a hardware serial port (DE-9, usually), but it will also work with a USB-to-serial adapter. The printer part of the EP44 was modified a bit and made available as the Brother HR-5 thermal printer.

Because the EP44 runs off batteries and can store some text, you can type on it when you’re out and about, and download that text into a computer when you get to the office or home. There are various ways to do this, but a very simple one involves the UNIX cat command, and the SEND button on the EP44.

Because MSDOS and FreeDOS (but not the WIndows CMD.EXE) have the CTTY command (change TTY), and are both single-user, single-tasking operating systems, it is trivially easy to pass control of the DOS computer to the EP44. This does need a hardware serial port, because DOS cannot drive the USB-to-serial adapters. Doing this allows you to send the text to the computer, and also allow it so work as a serial terminal for DOS.

So, last thing — how about a serial login on Linux?

Turns out it is remarkably easy.

Step one is to enable login from a serial TTY by editing /etc/inittab. Let’s say we are going to use the EP44 at 300 baud on /dev/ttyS0; then we  add this line, or uncomment an example line and modify:

T0:23:respawn:/sbin/getty -L ttyS0 300 vt100

This just tells it to create login T0. It has run levels 2 and 3 (no GUI, of course) and uses ttyS0 at 300 baud with vt100 emulation.

Most of these settings can be played with. For example, if using a USB-to-serial adapter, it might create a serial port of the form /dev/ttySX, but it is more likely to give you /dev/ttyUSB0. getty is just the program that does it (the are others — getty on Linux is really agetty, usually, but you can find others including mgetty). -L says this is a local line. Anyway, I created this entry and I rebooted, with the EP44 attached via a null modem serial cable and set to Terminal and 300 baud.

And this is what we see on the little LCD screen on the EP44:

devuan login prompt on the 16-character display

We’re in! The text flowing back and forth as you talk to the computer scrolls across the little screen, for what that is worth … but it is also captured on the printer. Long lines do get truncated… but still, it works. Here is a little session (scanned and thresholded to make it blacker):

Small Linux session. run df, see who's logged in, exit.So as we use the Linux box, the thermal paper rolls through. If I don’t want to capture the session, I just flip the paper release, so it does not wind through the typewriter. This was done on a desktop box as a test, but you could also connect to a SOC board, like a RPi or something, and do actual system admin using the EP44.

300 bored

Talking to the EP-44

Talking to the EP44 from a computer is dead easy. First, I wired up a null-modem cable (I ordered one, but it turned out to be a basic extension cable — wires were not crossed over. So I cut it in the middle and crossed them over myself).

Then I attached the cable to the EP-44 and to the serial port on the back of the computer (note, I used a real, hardware serial port for this, not a USB-to-serial converter).

Turned on the EP-44 and set it to terminal and to 1200 baud, 8 bit data.

On the computer, used stty to set /dev/ttyS0 to 1200 baud.

$ stty -F /dev/ttyS0 1200

$ stty -F /dev/ttyS0 -a

speed 1200 baud; rows 0; columns 0; line = 0; intr = ^C; quit = ^\; erase = ^?; kill = ^U; eof = ^D; eol = <undef>; eol2 = <undef>; swtch = <undef>; start = ^Q; stop = ^S; susp = ^Z; rprnt = ^R; werase = ^W; lnext = ^V; discard = ^O; min = 1; time = 0; -parenb -parodd -cmspar cs8 hupcl -cstopb cread clocal -crtscts -ignbrk -brkint -ignpar -parmrk -inpck -istrip -inlcr -igncr icrnl ixon -ixoff -iuclc -ixany -imaxbel -iutf8 opost -olcuc -ocrnl onlcr -onocr -onlret -ofill -ofdel nl0 cr0 tab0 bs0 vt0 ff0 isig icanon iexten echo echoe echok -echonl -noflsh -xcase -tostop -echoprt echoctl echoke -flusho -extproc

$ sudo adduser -a -G dialout username

Then typed:

$ cat /dev/ttyS0 &

$ cat > /dev/ttyS0

The first cat command takes anything from the serial port and puts it on the screen — in UNIX, everything is a file, including the serial device. The second command (not cast off), sends whatever I type on the computer to the thermal printer. So one could use this a bit like the talk and ytalk programs on UNIX.

That’s it, it works.

screenshot of a terminal session
Talking to the EP-44: Text on the screen of the laptop

scan of the same text on the EP44 printout
The same text on the EP44 printout

Now, the same connection can be used to send the contents of the printer’s memory (about a page or two of text) to the computer screen. You just press the Text button on the EP44 and cat the port to a file ($ cat /dev/ttyS0 > filename.txt).

Note that this is different from actually using the printer as a terminal, in that I am not sending commands to the computer and getting back the output, though clearly that can be done, seeing as the characters are moving between the two devices.

The text below was typed on the EP and uploaded to the computer using cat.


Blogpost

The Brother EP-44 can be used as an editor and word processor. It’s memory can hold about 3700 characters, which can be edited, modified and then either printed on the EP-44 or transferred via a null modem cable to a computer for printing, uploading or editing. The text you are reading now was written on the EP-44 without any of it being printed. Having said that, the 16-character screen of the EP-44 is not much good for editing. Indeed, if you get distracted and forget the start of the sentence, it can be all to easy to start one sentence and finish another.
I can check how many characters I have left by pressing CODE+r (‘REMAIN’). The manual, available online at http://munk.org/projects/Brother-EP44-User_manual.pdf gives details of the editing functions available. They are adequate, if not easy by modern standards. If you carried around enough equipment, it would be possible to send the text to an office over the phone lines via the RS232 port on the side, but it is hard to believe that anyone would bother. Even in the early 1980s, one of the little LCD notebook computers of the time, like the TRS-80 would be highly preferable (though three times the price). The main benefit of the EP lies in the attached printer, which means it is better used for input than output — input via the keyboard or via the serial line when using it as a printer. Speaking of input via the keyboard, I must say that the keyboard is surprisingly easy to use. It looks like a big calculator but types much better than that. Indeed, you can build up pretty high speed if you try. It works very well on the lap, and the keys are very reliable; you know when you’ve hit one, so you very rarely double hit or miss a character. The gaps between them help avoid hitting the wrong key, and mean that the overall dimensions are those of a full-sized device. Were I to make any change, I would put in a horizontal rather than vertical return key — why? — because I tend to hit it when I am looking for backspace.
One more comment. Although only showing 16 characters, the screen is surprisingly useful. It is big enough to show you the last word you typed, so you can quickly backspace over errors and fix them. If you are used to fixing errors on the spot rather than leaving them and going over the document later, then it is possible to make pretty clean copy without too much trouble.
As a final note, with this much text typed, I currently have 1280 characters left in the machine’s memory. Hence, we can see that the EP-44 (or EP44, depending on which documentation you read) can certainly provide enough space to write up a blog post of more than adequate length, especially when discussing a topic as boring and redundant as this one!
Now, at the end, let’s add in the non-ascii characters and see what can be downloaded over the serial line.
1234567890-=qwertyuiop asdfghjkl;’zxcvbnm,./
!@#$% &*()_+QWERTYUIOP ASDFGHJKL:”ZXCVBNM,.?
+ []{}<> $ \ ;’ #| &!@ *
OK, that’s done. Now we have 719 remaining.


Notes:

  • The text above between the horizontal lines makes up about 550 words, so we can estimate something like 650 words as the limit. Compare the list of characters that made it over the serial line with the type specimen:

scan of the typeface -- it's quite nice

  • The text above was sent by hitting CODE+s then text. Note that nothing seems to happen, but tail -f on the file works well and shows it to be transferred. To empty the memory and prevent the content getting printed at an inconvenient time, the simplest thing to do is turn the machine off, then turn it on with the C key (red cancel key) held down; this returns it to factory settings, a bit of a nuclear option. It is not supposed to print what is sent to the computer, but it does, so maybe there’s a bug in mine, I don’t know, but this will do.

Over and out

Note to self: Printing to the EP44 from Windows 10

OS: Windows 10, 64-bit, current as of 02 May 2019.

  1. Bought a USB to DE9 (DB9) cable that claimed to be FTDI
  2. It arrived and was a Winchiphead 340; asked for my money back
  3. Oh well. Plugged it in but Win 10 could not drive it. Removed it and installed 340.exe from the 340.exe/win7_win10/ folder on the little CD that came with the cable
  4. Plugged it in again
  5. Opened Device Manager; it was there as COM3
  6. Using Device Manager, set baud to 75, data bits to 8, parity to none, stop bits to 1 and flow control to none
  7. Plugged in the EP44 and set its terminal properties to match; use CR+LF to eat the LF that Windows sends (otherwise will get double-spaced output)
  8. Went to Add printer. Added a local printer to COM3 and chose the Generic Text Only driver
  9. Printed a test page, no problems
  10. Works; can print plain text and a handful of symbols

Photo showing the machine viewed from above.
The Brother EP44 dot matrix typewriter/serial printer.

The adapter does not work on Linux. I am more than a little annoyed by that, since that was why I wanted an FTDI one. I hardly ever use that Windows machine.

End it

Printing to the EP44 — doing it properly

I rigged up a dodgy way to print to the Brother EP44 using a simple three-wire cable. The problem with that is the printer cannot keep up with the serial port and the text starts to go funny.

Later, trying to play with it as a terminal device, I made a null modem cable and plugged a DE9 to DB25 adapter on it because the EP44 has a DB25 plug. I tried using that as a print cable, and because it has the full complement of wires for flow control, if I set the printer spooler to use XON/XOFF (software) flow control, I can print using lp without using a script that sends one line at a time — the printer can use the extra wires to signal to the computer to wait (buffer full).

screenshot showing the menu giving flow control options -- xon/xoff is software control
Using the CUPS interface at http://localhost:631 to set the options on the Brother EP-44 printer

The end result is that printing to the machine is very simple — if the full null modem cable is used. The 24-pin typeface is quite nice and very readable, and the only disadvantage really is the thin thermal paper (fax roll) that I have to use.

Printing from GUI applications does not work unless (like, say, nedit) they call lp to send the job. Using the CUPS browser interface to set up the printer works, but I have to use lp to send the job. Maybe I can figure it out, but it’s not really important.

The EP44 is a very portable printer. Works for ages off its batteries, or can even be run from the 5V output from a USB powerpack, if you don’t mind butchering a USB cable, as shown on YouTube.

It’s just a curiosity, but an impressive little one.

Here is setting it up using a hardware serial port, /dev/ttyS0.

  • Printer set to 1200 baud, 8 bit, no parity.
  • Open CUPS web interface
  • Add Printer
  • Serial Port #1
  • Set as in picture above
  • name it ep44
  • Make: Generic
  • Model: Generic Text-Only Printer (en)

Can set some defaults (TAB size, whether continuous or roll of paper, and so on). Don’t bother printing from the GUI, but open a command line, and…

$ lpstat -a
ep44 accepting requests since Mon 22 Feb 2021 17:22:12 AEDT
$ lp -d ep44 some-text-file.txt

Works a treat. Remember to set the printer so that line endings ar CR/LF, to absorb the unneeded line feed. Set it to typewriter codes to do underline and super/subscript using ESC codes. Otherwise, 7 or 8 bit. Need tor read the manual! (Can find it online with a web search.)

The future is 1984!

Time fixes the EP44

While I was monkeying around with my Brother EP44 — one funky old bit of hardware — I managed to send it some weird code that caused it to print really condensed characters and not respond to the return key… I was trying to use it as a serial printer, which worked on Windows via a USB to serial adapter and on Linux with a hardware serial port, but I could not get it to work on Linux via a USB adapter.

After I messed with it, whether I was typing or sending to it from the computer, the text looked like this:

Scan of bad text
Weird condensed text from my EP44 — not what I wanted to see…

And I thought maybe I’d bricked the thing. I tried turning it off and on again and suchlike, and there’s some kind of reset key combination too (turn it on with the red C key depressed), but that did not help. I took out the batteries for varying lengths of time and put them back in. No good.

As a last resort, I took the batteries out and left it in a cupboard for months, hoping that when it reinitialised it would be all right. Yes, I was hoping for some kind of magic to occur. And it did.

Here is the most recent typing test:

a scan of the printout -- looks great!
Character set from the EP44 — ‘a’ is used to demonstrate the range of accents available

So it’s alive! I should note that I scanned the type at 600 by 600 greyscale using xsane, then used ImageJ to threshold it. That makes it look very black. The original scan looks more like this:

The scan before thresholding

It would not look so bad if I used clean, flat paper! Also, the fax roll is so thin it should really be backed when scanning. The thresholded image gives a good idea of the glyph shapes and the wide range of choices. The accent characters can be put above any character you like — they print, but do not move the typehead, then the next character goes underneath.

K41693501
Serial number

The logo on the EP44

Yay.


Comparing typefaces

scan of type


Comments

The Super-Speed is lovely to type on, and the result is pretty good for a machine nearly 80 years old. Of all these machines, this is the one you’d put in a secluded office and use to write a great early 20th century  novel.

The 17 is pretty good given how rusty it was, but it’s a slow typer with some sticky keys.

The SG3 stands out as both very even and more modulated, and with very strongly lining figures. Almost as regular as the Selectric, which is so sharp and precise and dry. Apart from the Selectric, this is the one you’d use in the office at the firm.

The Dora is also nice and even, if dull; at present the capitals sit a little high, so some adjustment is needed, I suppose, though I doubt I’ll bother.

Hermes 10 (electric) is a little like the SG3 — some modulation, and more rounded serifs. Also, both happen to have quite dark ribbons, which makes a difference too.

The 3912C is pretty regular — but it is an electric, so the darkness ought to be uniform! Letters fade a little at the top, so either it’s not striking in the right place or the platen is just too hard. The 700T is very good for clarity and regularity, but the position of the caps isn’t matching the lower-case letters too well — could be my weight on the shift key, though, since the T and D seem okay, it’s just the B. Seems to be exactly the same selection of characters and typeface as the 3912C.

The AX-10 is a daisy wheel machine and this wheel has a slyly stylish font. The wheel says Prestige 1012. Locations of symbols ($, # etc) are more similar to a computer keyboard, as might be expected for a relatively new machine. A good machine for kids to type on — clean type and not too much key pressure needed.

The other Brother, the EP-44, is a very different beast. It is a thermal dot matrix printer with a keyboard. It cannot do carbons, but can work as a serial text-only printer. Being electronic, it has a second shift key that gives access to a wider range of characters — hence the third line. The typeface looks a bit like a monospace Times. Not bad though looks a bit pixelated on close inspection and descenders are basically false. Can also do underlines.

The cw-16 probably looks more pixelated then the EP, but gives a very wide range of characters and the options of bold, 10 or 12 pitch, double width (in each pitch) and underlined. This example is, like the EP-44 example, printed on thermal paper, and again the descenders are very shallow, almost false.

SM-8 is very niceely aligned, and only slightly understruck right at the tops of the ascenders. A very nice and quite portable machine.

The Clipper looks pretty good for a machine its age and with an older ribbon. Sharp, well-aligned and even, except for the fractions — and I think I hit those a bit hard… and maybe they need a clean, too.


Printing from HP 200LX palmtop

The HP 200LX has a serial port on the side. It’s little and rectangular, but pretty standard apart from that. Since I have acquired an appropriately vintage serial printer, I thought I’d give printing from the LX a try.

It turns out to be remarkably simple once the hardware is in place.

The printer has a female DB25 plug on it. I had an old serial line that had a male DB9 (DE9) on one end and a female DB25 on the other, but I also have an adapter that will make a male DB9 into a male DB25. Thus, it seemed to me I could put a rectangular plug on the end of the cable attached to the male DB9, then convert that to DB25 and plug it into the printer.

The first way I tried to get a plug that would fit the 200LX serial port was using a 5 x 2 section of IDE ribbon connector — but the pin spacing is too big by a factor ot 5/4 (4 pins fit in the space where 5 need to go). Purely by chance, I found a broken Conner CP2121 hard drive, and you can see that on the PCB there are some pins and on them is a sort of socket plug thingy (see, I know all the technical terms). Since the drive was cactus, I pulled this off, filed it down to be 5 x 2 and found that it fitted perfectly!

Photo of dismantled hard drive
The Conner HDD opened up — yellow arrow shows the pins in question

photo showing the white plastic plug
The case of the Conner HDD with the plug, after it was removed from the pins shown in the previous picture and filed down to size

Soldering the wires on was tricky, but since I was making a 3 wire null modem (see this page), I did not need to deal with all of them. I decided to solder them all because I might want to make up a full handshaking cable at some time, but I could not use them all because the DE9 was missing some wires. I think it was a commercial ‘dumb’ null modem cable or something. Checked for continuity and crosstalk frequently.

Wiring is pin 2 on end 1 ro 3 on the other, 3 on end 1 to 2 on the other and 5 to 5
The null modem wiring — image from https://www.lammertbies.nl/comm/info/RS-232_null_modem.html


photo of the plug, held in pliersphoto of the plug, held in pliers
Soldering the wires onto the back of the plug

I then used a multimeter to check which wire went with what pin on the DB9 plug, and soldered the two halves together to get my LX null modem cable. The main challenge is really anchoring the wires such that you don’t break the connections when pulling out the plug (my main tactic — very subtle —  is to use lots of tape). The other trick is that a rectangular plug can be put in upside down. The LX socket has a rebate in the top edge to prevent this, so I glued and taped a waste bit of wire insulation to the appropriate side of the plug so it would only go in one way. The other trick is to remember that the pin numbering you see on the LX has to be mirrored (right to left become left to right) when numbering the wires on the plug.

Here is a picture of the final cable — hardly a professional job, but I could confirm using a multimeter that the three wires I needed (2-3, 3-2 and 5-5) were unbroken, and that there was no crosstalk between wires. Ready to go!

photo, showing lots of tape
The final cable — hardly tidy

I set the printer to 300 baud (it is very old), 8 data bits, no parity.

I used the Setup menu on the LX to turn on the COM1 port (to save batteries, I keep this turned off whenever I am not actually using it) and to configure the printer. The old printer is plain text, so Epson FX-80 is the most suitable of the three printers built into the LX; chose 300 baud.

Saved all the changes and exited Setup.

Opened Memo, opened a memo and sent it to the printer. No worries! Almost … the printer is really a typewriter, and it prints slowly and has only 160 bytes (not KB, B) of a print buffer, so even at 300 baud the characters are soon coming too fast for it. It can only print small files, or bits of a file. But I can print from:

  • Lotus 123
  • Memo
  • Appointment
  • And probably other things if I could be  bothered.

What about printing from the command line?

Opened the DOS prompt and typed:

a:\> mode com1:300,n,1,8,b

Now, it is tempting to then use mode to redirect the printer (lpt1:) to the COM1 port, but Setup has already done this, so now I just need to go:

a:\> copy file.txt lpt1:

the serctl program that comes with the LX can turn the serial port on or off, wired or infrared, from the command line.

So there it is, the LX can print to the EP44. There was one other thing to try. The LX comes with a terminal program, and the EP44 can store 2 pages of text in its own memory, Can the EP44 text be dumped into the LX?

Yes.

If I run the terminal program, set the baud rate to match the typewriter, and then start capturing the session (but without echoing local commands to the file!) then I can hit ‘Text’ on the typewriter and the contents of its memory will appear on the screen of the LX and then in the capture file.

Thus, the battery-powered HP 200LX can be paired with the battery-powered (but much larger) EP-44 in some weird kind of 1990s mobile office situation.

Who cares?


Serial port pinout

[1 2 3 4 5 ]
[6 7 8 9 10]

1 – DcD
2 – Rx
3 – Tx
4 – DTR
5 – GND
6 – DSR
7 – RtS
8 – CtS
9 – RI
10 – Shield ground


The Brother EP44 as a serial terminal for DOS

This is so nerdy.

I made up a printer cable for my EP-44 – it is the ‘Common serial printer cable’ taken from this page. I don’t normally take images from the web, but since pages do sometimes vanish, this is the wiring diagram I followed:

DB-9 (actually DE-9) to DB-25 serial printer cable wiring diagram

And it works very well as a serial printer cable from Linux (using a hardware DE-9 port). In fact, it works very well from DOS. I installed FreeDOS on a partition on an old Compaq Armada E500; it has a hardware serial port (DE-9) so is very nice for monkeying around.

Plugged the EP-44 into the computer and turned both on. Hint: this won’t work if this step is omitted!

Photo
The EP-44 connected to the Armada by a home-made cable

Set the EP44 to 1200 baud, N parity, 8-bit data and used the DOS MODE command to set the port to the same.

C:\> mode com1:1200,n,8,1,b

And I could print by copying stuff to COM1. Can also try:

C:\> mode lpt1:=com1:

This assigns COM1 as the printer port. The problem is that the EP44 has a very small buffer (160 bytes, IIRC), so as once before, it is a good idea to send the file a line at a time, using a little script. Slowing the baud rate right down (the computer can go as low as 110) helps, but even 110 baud is still a lot faster than the typewriter can print.

Now, I recently found out that using a full null-modem cable (uses more than the 4 wires in the diagram above) as a printer cable works really well with Linux — it allows for XON/XOFF flow control and line-by-line printing is not needed. DOS is not able to make use of the same cable, for some reason (or at least I could not do it), but works well with the simpler cable. So the EP44 (with and without hyphen) acts as a battery-powered 24-pin (NLQ) thermal printer that can be transported around with your laptop. How very 1990s!

But it gets funkier. If you like that sort of thing.

DOS has a little-used command called ctty, ‘change tty’. It can be used to make DOS look somewhere other than the console (ie keyboard and screen) for input and output. I found that it works with the EP-44, though the baud rate has to be set right down or the EP44 keystrokes don’t get captured (most worked, but the Enter key was flaky at higher baud. Who knows?).

On the DOS PC typed:

C:\> mode com1:110,n,8,1,b
C:\> ctty com1

with the EP-44 set at 110 baud, 8-bit data, no parity.
This gave me this on the EP44 screen (and on the fax roll I was printing onto):

photo
DOS prompt on the EP-44 screen

I could then type commands on the EP44 and get the output on the printer (it also appeared, uselessly, on the 16-character screen), with the console (screen) on the computer looking frozen and the computer keyboard not taking input. Here is a scan of a brief DOS session, as it happened on the EP-44.

scan of printout
DOS session on paper

At the end, as you can see, I typed

C:\> ctty con

and control went back to the computer and its keyboard. As you can see, during the session I can get listings, create and view files, and move around the directory structure. I’m sure I could do lots more. Anything that uses graphics, or addresses the video RAM directly, or even addresses the screen out of order, won’t work. I read somewhere that a DOS Elvis version worked on a DOS serial terminal; how it would work with a paper roll, I don’t know. I guess you’d have to use EDLIN or something! When I tried to use FreeDOS’s edit to look at a file, the screen on the computer lit up. The EP-44 printed the console output that firing up the editor gives (see below), but the editor screen itself appeared on the computer screen and could be used on the computer via the computer keyboard. When I exited edit (using the computer keyboard), control passed back to the EP44.

It would be possible to use a normal DOS session to put the commands that initiate the serial session into autoexec.bat, such that the machine would boot into that state. Then you’d have headless DOS. Kind of.

scan of output
Running edit

I found that many but not all of the special characters (accents, pound sign, that sort of thing) that the EP44 could generate could be written to a file and would then show up when viewing the file on the computer.

scan of printout
Non-keyboard characters that worked

It depends on where they sit in the ASCII table, I guess.

You can backspace over a mistyped command or file name (like the word ‘symbol’ above), and fix it before sending it to the computer, but of course the typewriter has already printed your mistake, giving overwritten results.

The typewriter lets you choose between CR and CR+LF for line endings, so if you get too many empty lines, try adjusting that setting. DOS uses CR+LF, so if the typewriter is just expecting CR it will not eat the LF and you get double-spaced output.

photo
The scanned output as it came out of the typewriter

Of course, this is just a toy. I tried playing with agetty under Linux, but I could not get the same results, not with the simple cable nor the full null-modem cable. Probably some serial port settings are not right, but I ran out of enthusiasm when trying to sort it out.

Anyway, useless but nifty.

Printing to the Brother EP-44: Escape codes and ASCII symbols

The EP-44 is a thermal printing typewriter from around 1984. It also comes with an RS-232c port and the documentation sys it can be used as a printer and terminal.

I’ve been exploring how to use it as a printer.

Here’s some stuff about escape sequences and formatting text when printing to the EP-44.

The EP-44 can be set to expect text encoding as ‘7BIT’, ‘8BIT’ and ‘T/W’. 7 and 8 bit correspond to ASCII codes and T/W is a slightly different code table that includes a couple of escape sequences for controlling the typewriter.

T/W mode

If we set the typewriter in T/W mode, we can make it do superscripts, subscripts and underlines by entering escape sequences into the string of text sent to the machine. One can enter escape sequences in Vim by going into insert mode and typing Ctrl+v then Esc. In the editor screen it should look like ^[ (but typing caret then square bracket won’t work!). Then type the key. ^[D scrolls to give superscript; scroll back down with ^[U; reverse the order to do subscript. ^[E turns underline on, ^[R turns it off.

Here is a screenshot of a text file in Vim:

A screenshot of the file, showing escape codes.
A file, with escape codes, viewed in Vim.

Vim kindly syntax highlights the escape codes.

Here is the printout, printed by simply catting the file to /dev/ttyS1 (in this case):

A scan of the printout.
The printout.

So we can see that the escape codes do their job. Remember, this is with the typewriter in T/W mode; in 7BIT or 8BIT this does not work.

Quirks of T/W mode include: if you send a keyboard caret (^) it prints a raised 2 (like a squared). Left brace gives a one-quarter symbol, right brace gives pilcrow, back tick gives degree symbol, pipe gives one-half and tilde gives section mark. Actually, probably this is pretty useful.

So that’s T/W mode — ideal if super- and subscript and underline are important and the unaccented, first 128 ASCII characters are all you need. (Basically, the characters you can access using the keys with or without the shift key).

Also, for some reason ^[Y gives a plus/minus symbol.

8BIT mode

8BIT mode gives access to (some of) the ASCII characters up to FF (number 256). But if we set the typewriter to 8BIT and send the text file shown above, we get this:

Screenshot, showing how the escape codes don't work.
Same file, 8BIT mode.

So the escape codes don’t work. But we do get access to some more characters.

I fired up bvi and made a file consisting of hex values from 20 (a space) up to FF, plus a little trick in the second half. Here’s what it looks like in bvi (I love that VGA font):

Screenshot showing the bvi window.
Hex view of the file.

When we print this file, we get:

Scan of printout.
Printing to the typewriter using ASCII values up to 256 (FF).

First, we can see that the caret etc are correctly interpreted. Though I cannot see a pilcrow anywhere! So what’s the code for that?

Second, we see that (as the EP-44 manual shows) we get access to a lot more characters. Most can be entered from the EP-44 keyboard, though not all (I can’t see guillemets on the EP-44 keyboard, but I guess they’re in the ROM somewhere since they’d be used on French versions, for example).

The line shown as: 0000…///###.##

Actually consists of four O, three backspace characters (hex value 08), three slashes, three hashes, one tab character and two hashes.

We can see that the backspaces work, and give us three slashed O. This means in 8BIT mode we can superimpose characters; for example we could put a hat (caret) on top of a variable, or a degree symbol for an accent (though accented A and a are available elsewhere).

The last bit of the file shows that this lets us overcome the lack of underline escape codes in 8BIT mode — we can backspace and then print an underscore character. I’ve done it character-by-character, but based on the clattering of the typewriter that this engendered, it might be better to write the whole phrase then backspace and do the underline all in one go.

This would also allow strike-through, using a series of hyphens, though of course they would not meet, so it would be a dashed line.

Could be quite good for ASCII art.

Since the 8BIT codes include a superscript 2, if we were only typing stuff with squares that would be the way to go!

I think the tab character worked, but I’m not sure since the gap is only about 1 character wide — but that could reflect the tab stop, I’m not sure.

Useful references for this were: http://www.asciitable.com/.

and

The manual: http://munk.org/projects/Brother-EP44-User_manual.pdf.

Conclusion

The 8BIT mode is preferable unless superscript and subscript are important. 7BIT was just like 8BIT but limited to the first 128 characters.


Madness.