mrxvt on cygwin — 2018 style

I’ve installed mrxvt on Cygwin once before — it was not as simple as it might have been. So I’ve moved jobs and computers and now I want to install it on Cygwin on Win 10 64-bit. Again, not as simple as I might have liked.

First, install the dependencies for building:

These are: xorg-server-devel, automake, autoconf, libtool, make (thought more about make below)

I used

$ apt-cyg install xorg-server-devel automake autoconf libtool

from the Cygwin command line, but you may just as well use setup.exe.

Then, grab the sources. Let’s try both — stable and unstable.

First, tried 0.4.2 — turns out I need to specify build type.

$ ./bootstrap.sh
$ ./configure --enable-everything --disable-debug --build amd64
$ make

Bingo! The binary is in src/mrxvt.exe and I can ‘$ make install‘ if I want.

How about 0.5.4 now?

There is no bootsrap.sh, so copy it in from 0.4.2 (or just run ./configure without bootstrap).

$ cp ../mrxvt-0.4.2/bootstrap.sh .
$ ./bootstrap
$ make
C:/Users/darren/installs/getgnuwin32/GetGnuWin32/gnuwin32/bin/make all-recursive
make[1]: Entering directory `C:/cygwin64/home/darren/installs/mrxvt/mrxvt-0.5.4'
Making all in doc
make[2]: Entering directory `C:/cygwin64/home/darren/installs/mrxvt/mrxvt-0.5.4/doc'
make[2]: Nothing to be done for `all'.
make[2]: Leaving directory `C:/cygwin64/home/darren/installs/mrxvt/mrxvt-0.5.4/doc'
Making all in src
make[2]: Entering directory `C:/cygwin64/home/darren/installs/mrxvt/mrxvt-0.5.4/src'
gcc -DPKG_CONF_DIR=\"/usr/local/etc/mrxvt\" -I. -I.. -g -O2 -Wall -fPIC -c command.c
gcc: fatal error: no input files
compilation terminated.
make[2]: *** [command.o] Error 1
make[2]: Leaving directory `C:/cygwin64/home/darren/installs/mrxvt/mrxvt-0.5.4/src'
make[1]: *** [all-recursive] Error 1
make[1]: Leaving directory `C:/cygwin64/home/darren/installs/mrxvt/mrxvt-0.5.4'
make: *** [all] Error 2

Errors! On the other hand, it seems to be getting make from a gnuwin32 install, not from Cygwin. Worry about that later.

First, did this — went into src and ran the compile command for command.c manually (copied from output above):

$ cd src
$ gcc -DPKG_CONF_DIR=\"/usr/local/etc/mrxvt\" -I. -I.. -g -O2 -Wall -fPIC -c command.c
command.c: In function ‘rxvt_process_keyrelease’:
command.c:2801:2: warning: ‘XKeycodeToKeysym’ is deprecated [-Wdeprecated-declarations]
ks = XKeycodeToKeysym(r->Xdisplay, ev->keycode, 0);
^~
In file included from rxvt.h:222:0,
from command.c:40:
/usr/include/X11/Xlib.h:1687:15: note: declared here
extern KeySym XKeycodeToKeysym(

And that indeed generates process.o. So, what if I run the compile command on all the .c files manually? It’s not hard. Here’s a little script:

$ cat file
gcc -DPKG_CONF_DIR=\"/usr/local/etc/mrxvt\" -I. -I.. -g -O2 -Wall -fPIC -c command.c
gcc -DPKG_CONF_DIR=\"/usr/local/etc/mrxvt\" -I. -I.. -g -O2 -Wall -fPIC -c debug.c
gcc -DPKG_CONF_DIR=\"/usr/local/etc/mrxvt\" -I. -I.. -g -O2 -Wall -fPIC -c encoding.c
gcc -DPKG_CONF_DIR=\"/usr/local/etc/mrxvt\" -I. -I.. -g -O2 -Wall -fPIC -c grkelot.c
gcc -DPKG_CONF_DIR=\"/usr/local/etc/mrxvt\" -I. -I.. -g -O2 -Wall -fPIC -c init.c
gcc -DPKG_CONF_DIR=\"/usr/local/etc/mrxvt\" -I. -I.. -g -O2 -Wall -fPIC -c logging.c
gcc -DPKG_CONF_DIR=\"/usr/local/etc/mrxvt\" -I. -I.. -g -O2 -Wall -fPIC -c macros.c
gcc -DPKG_CONF_DIR=\"/usr/local/etc/mrxvt\" -I. -I.. -g -O2 -Wall -fPIC -c main.c
gcc -DPKG_CONF_DIR=\"/usr/local/etc/mrxvt\" -I. -I.. -g -O2 -Wall -fPIC -c menubar.c
gcc -DPKG_CONF_DIR=\"/usr/local/etc/mrxvt\" -I. -I.. -g -O2 -Wall -fPIC -c misc.c
gcc -DPKG_CONF_DIR=\"/usr/local/etc/mrxvt\" -I. -I.. -g -O2 -Wall -fPIC -c mjpg.c
gcc -DPKG_CONF_DIR=\"/usr/local/etc/mrxvt\" -I. -I.. -g -O2 -Wall -fPIC -c mpng.c
gcc -DPKG_CONF_DIR=\"/usr/local/etc/mrxvt\" -I. -I.. -g -O2 -Wall -fPIC -c netdisp.c
gcc -DPKG_CONF_DIR=\"/usr/local/etc/mrxvt\" -I. -I.. -g -O2 -Wall -fPIC -c pixmap.c
gcc -DPKG_CONF_DIR=\"/usr/local/etc/mrxvt\" -I. -I.. -g -O2 -Wall -fPIC -c ptytty.c
gcc -DPKG_CONF_DIR=\"/usr/local/etc/mrxvt\" -I. -I.. -g -O2 -Wall -fPIC -c rxvt.c
gcc -DPKG_CONF_DIR=\"/usr/local/etc/mrxvt\" -I. -I.. -g -O2 -Wall -fPIC -c rxvtmem.c
gcc -DPKG_CONF_DIR=\"/usr/local/etc/mrxvt\" -I. -I.. -g -O2 -Wall -fPIC -c screen.c
gcc -DPKG_CONF_DIR=\"/usr/local/etc/mrxvt\" -I. -I.. -g -O2 -Wall -fPIC -c scrollbar.c
gcc -DPKG_CONF_DIR=\"/usr/local/etc/mrxvt\" -I. -I.. -g -O2 -Wall -fPIC -c scrollbar-next.c
gcc -DPKG_CONF_DIR=\"/usr/local/etc/mrxvt\" -I. -I.. -g -O2 -Wall -fPIC -c scrollbar-plain.c
gcc -DPKG_CONF_DIR=\"/usr/local/etc/mrxvt\" -I. -I.. -g -O2 -Wall -fPIC -c scrollbar-rxvt.c
gcc -DPKG_CONF_DIR=\"/usr/local/etc/mrxvt\" -I. -I.. -g -O2 -Wall -fPIC -c scrollbar-sgi.c
gcc -DPKG_CONF_DIR=\"/usr/local/etc/mrxvt\" -I. -I.. -g -O2 -Wall -fPIC -c scrollbar-xterm.c
gcc -DPKG_CONF_DIR=\"/usr/local/etc/mrxvt\" -I. -I.. -g -O2 -Wall -fPIC -c session.c
gcc -DPKG_CONF_DIR=\"/usr/local/etc/mrxvt\" -I. -I.. -g -O2 -Wall -fPIC -c strings.c
gcc -DPKG_CONF_DIR=\"/usr/local/etc/mrxvt\" -I. -I.. -g -O2 -Wall -fPIC -c tabbar.c
gcc -DPKG_CONF_DIR=\"/usr/local/etc/mrxvt\" -I. -I.. -g -O2 -Wall -fPIC -c transparent.c
gcc -DPKG_CONF_DIR=\"/usr/local/etc/mrxvt\" -I. -I.. -g -O2 -Wall -fPIC -c xdefaults.c
gcc -DPKG_CONF_DIR=\"/usr/local/etc/mrxvt\" -I. -I.. -g -O2 -Wall -fPIC -c xftacs.c

(I just made this by copying the compile command and listing all .c files to a file then prepending the compile command to each line using vim).

OK, in src, where my file full of compile commands is called ‘file’:

$ bash file

OK, yes! Now I have a bunch of .o files. Now go to build directory and rerun make.

$ cd ..
$ make

Success! The mrxvt.exe binary in in the 0.5.4 src directory. I can run both:

screenshot of the two versions of mrxvt, both running
mrxvt × 2

Now I can install whichever one I want to use.

Question: Was the 0.5.4 problem real or due to using the wrong make.exe? After moving the .o and mrxvt.exe out of src, tried this:

$ apt-cyg install make
$ which make
/usr/bin/make
$ ./configure --enable-everything --disable-debug --build amd64
$ make
gcc: fatal error: no input files

So, no, the problem was not the wrong make.

Next: added to menu:

$ cd /usr/share/applications/
$ cp uxterm.desktop mrxvt.desktop

Then changed references to uxterm to mrxvt, and changed the icon name to mrxvt-48x48:

$ cat mrxvt.desktop
[Desktop Entry]
Name=mrxvt
#GenericName=Terminal
Comment=tabbed terminal emulator for the X window system
Exec=mrxvt
Terminal=false
Type=Application

My mrxvt icon. Take it if you like!

Icon=mrxvt-48x48
Categories=System;TerminalEmulator;
Keywords=shell;prompt;command;commandline;cmd;

Then, went to this post, copied the png mrxvt icon and used gimp to save it as a 48 × 48 .png file called mrxvt-48x48.png, and put it in:

/usr/share/pixmaps

But then I found the icons in /usr/local/share/pixmaps/ so I just used one of them instead.

Tah. Dah.

Updating my Debian box — a non-expert’s experience

My Debian desktop box was running the LTS (long term support) version (in other words, older than oldstable, getting minimal updates and getting outmoded and old and crufty), which is the 7.x series. Support for that even as LTS is scheduled to end May 2018, not far away.

So I bit the bullet and decided to update to current, which is 9.3 (‘stable’). I like Debian, rather than one of the many distributions derived from it. I’ve found for me it words pretty well. Most problems I have are with applications not the OS, and when I’ve fiddled around with other Linux distributions, I have generally found that they are different but not better, and often have fewer packages. So Debian it is.

I don’t have a great network connection where I live (in the bush in Australia, which has poor broadband even in towns), so rather than do a net install I downloaded the iso for the installation disk and burned it. This file: https://cdimage.debian.org/debian-cd/9.3.0/amd64/iso-dvd/debian-9.3.0-amd64-DVD-1.iso. I did not bother grabbing 2 and 3; I have enough internet to grab anything not on the DVD from the server, and eventually the DVDs get out of date.

I also made what I think is a good decision about backups. I began with a 1TB drive. Not big now, but  the computer is about 7 years old, I’d guess. Maybe more. It has an i7-2600K, which was a pretty good chip at the time. When I got it I was using it for numerical modelling, like here, but I don’t do much of that these days, and with 8 GB RAM it is still perfectly capable of running a responsive desktop, so I do not feel a need to upgrade the processing power or the RAM. Since then, I bought a 2 TB drive for storing media, and bunged it in the case and mounted it as /home/username/Music. Worked fine. So with that in mind…

    1. Went into VirtualBox and exported all the virtual machines I wanted to keep to an appliance, ‘Appliance.ova’ — this was a 34 GB file.
    2. Went into firefox and exported my bookmarks to a json file.
    3. Used rsync to copy /home/username (including the Music folder, since it was mounted at the time) to an external USB backup drive called SAMSUNG. Here is the rsync command, for reference:
      rsync -a -v -v -v --stats  --log-file=logrsync.log /home/username /media/SAMSUNG/home/
      

      and note that I have excluded nothing, since I want to keep my web history as well as the actual data. This command will grab stuff like .mozilla/firefox profiles and the like, though more on that later. The Appliance.ova file was also in a place where it would get backed up externally.

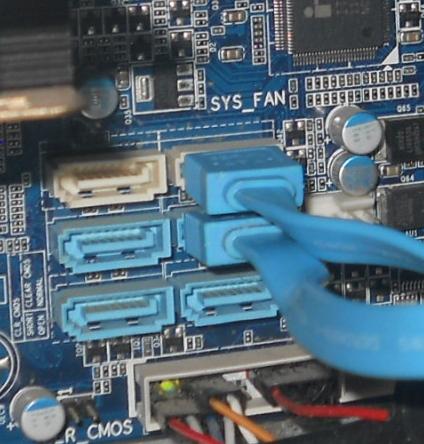
    4. Left the 1 TB drive in the case but disconnected power and SATA cables from it. Since I’d been getting some errors from the drives, I decided to use the second row of SATA sockets for the new install where previously I’d been using the first. So I plugged in the CD/DVD and the 2 TB hard drive into the second row of slots, the DVD into the white socket and the HD into the first blue socket. I made sure to use SATA cables with clips.

      Picture of the mother board and which SATA sockets I used.
      Using the right-hand set of sockets for the SATA drives instead of the left.
    5. Double-checked that the USB backup drive had all my data — /home from the 1 TB drive and Music from the 2 TB drive. Yes, it did. Also had the Appliances.ova and the .mozilla hidden directory with all my web history and stored passwords (more on that later). Disconnected it from the machine. So now only the 2 TB HD and the DVD drive were connected.
    6. Put Debian 9.3 DVD 1 into the drive and rebooted the computer.
    7. Pressed ‘Del during boot to bring up BIOS menu and selected CDROM as first boot device. BIOS menu showed that we’re using IDE channel 1, not channel 0 as previously. That’s OK.
    8. Let the machine boot off the DVD and selected Install, not graphical from the menu. Graphical is probably fine but I’ve been doing this for a while and I have no problem with ncurses. Wired internet connection was in and on.

      Picture of the menu.
      Menu to select the Debian install method.
    9. Clicked through the install (Language, Location, Keyboard map, Hostname, Domain, Root password, User account, Clock

      Picture of the menu.
      Menu to select language.
    10. Partitioned the HD. SCSI 2(010)(sda). Whole device. 16 GB swap (2 × the RAM), then rest of disk at ext4 Linux, mount point ‘/’, and set this partition bootable. Done.
      Picture of the partitioner screen.
      Partitioning — setting up swap space.

      Picture of the partitioning.
      Setting up the root partition.
    11. Write the partition information to disk.
    12. Start installing.
    13. Threw a corrupt file error while installing the base system and dumped me into a text menu. Selected ‘Install base system’ or whatever it was (ie, have another go, please) and it went through. I only installed the base system (ie, command line tools).

      Picture of the error screen.
      Red screen means error.
    14. Linux image was amd64, and the kernel image (it told me) was 4.9.0-4.
    15. Told it I was not scanning anymore DVDs.

      Picture of the apt configuration screen.
      Setting up apt (the package management).
    16. Yes, please set up a mirror.
    17. Chose a mirror and let it configure apt. It said something about ‘upgrading’ but I don’t want to toast my bandwidth so I turned off my router. For now I just want to use the DVD, so once apt was configures with the correct mirror, I figured it would be OK to turn off the internet.
    18. Chose some software, set it to install but it halted at one pointed — needed to get something from the net, should not have turned it off yet. Reran with net on and ok.
    19. Yes, GRUB to MBR, please.
    20. Rebooted with web off. Changed BIOS to boot from HD and left DVD in as a file repository.
    21. As root, edited /etc/apt/sources.list and commented out the web repositories for now.
    22. apt-get update
    23. apt-get –install-suggests install mate-desktop-environment.
    24. Chose gdm3 as my display/login manager, since MATE and Gnome should work well together.
    25. Added some other stuff using apt-get; xsane, libreoffice, that sort of thing.
    26. Plugged in backup USB HD and, with a command line open in /home/username/, coipied all the backed-up material into my new home directory:
      cp -irv /media/username/SAMSUNG/home/username/* .
      cp -rv .[^.]* .
      
    27. Edited /etc/apt/sources.list to remove comments from web repositories, now that the bulk of the software was installed.
    28. Downloaded VirtualBox installer from https://www.virtualbox.org/wiki/Linux_Downloads.
    29. As root, installed a few packages it needs:
      apt-get install dkms
      apt-get --install-suggests install linux-headers-amd64 linux-headers-4.9.0-4-amd64
      apt-get install  libqt5opengl5
      dpkg -i virtualbox-5.2_5.2.6-120293~Debian~stretch_amd64.deb
    30. Then ran VirtualBox and imported the Appliance.ova file, and there everything was. Once I installed the guest additions, it all worked smoothly.
    31. Ran Firefox. Despite the exact copy of the old profile directory, it remembered nothing. I tried running firefox -P and selecting the profile that matched the old one rather than the new one it had cfreated, but that did not seem to help either.
    32. Mounted the old 1 TB HD using a SATA to USB adapter and recopied old profile directory from the 1 TB HD to the new directory (profiles live in /home/username/.mozilla/firefox with filenames like brqhj45.default-1234456787655).
    33. That fixed my passwords but not the bookmarks.
    34. Within the bookmark manager of Firefox, imported the json file I created in step 2, and that fixed that. Done.

So at the end I had my old root drive (minus the Music folder) on the old 1 TB drive as emergency snapshot and backup, I had a current backup on the external USB HD (including the Music folder) and on the 2 TB drive, which used to be just the Music folder, I had everything, including Music.

Still got some issues with Windows progs installed under the old wine not working with the new one — but install media not working with new one either so cannot reinstall…

Relatively painless.