Reinstalling GRUB on SliTaz

Well, the FreeDOS install that shares the disk with SliTaz went barmy, and on reinstall I toasted the MBR so can only boot FreeDOS. Stupid.

Not that hard to fix.

  1. Booted from the SliTaz 4-in-1 CD, same as the one used to install it
  2. Chose my keymap (UK)
  3. Let it boot
  4. Once I had the desktop, opened a terminal window and started a root session:
    $ su

    (the live disc uses ‘root’ as the root password)

  5. Mounted the root (/) partition of the SliTaz install on the HDD:
    # mount /dev/sda3 /mnt
  6. Now, at this point some instructions talk about mounting /proc and stuff and using chroot; this did not need anything so complicated (all the config files were still on /dev/sda3, just the bootloader in the MBR was missing) so first verified the version of GRUB:
    # grub-install --version
    grub (GNU GRUB 0.97)
  7. So you can see that SliTaz uses an older version of GRUB; this is important because the next command is different for versions after 1.98:
    # grub-install --root-directory=/mnt --no-floppy --recheck /dev/sda
  8. Did not throw any errors; great
  9. Rebooted and got a GRUB menu, then dropped through to a menu that allowed me to select FreeDOS or SliTaz
  10. Note: The menu for GRUB1 is in /boot/grub/menu.lst, and you add FreeDOS to it by adding this to the end of that file:
    title FreeDOS
    root (hd0,0)
    chainloader /kernel.sys

Now, this is GRUB instead of GRUB2, which most modern systems will have. GRUB2 would use --boot-directory=/mnt/boot (and has a much more complicated configuration file set up, because we all know that things have to get more complicated instead of remaining simple, because that’s how we can tell progress has happened) but I cannot tell you fort sure that would work, because it’s not what I did.

Caveats:

This approach only works if the software on the install CD matches that in the booted partition, because I am effectively running the install program version that is on the CD, not on the HDD that I am installing it to. I know that this is the exact same CD I installed SliTaz from, and that I never changed the SliTaz install to a different version of GRUB or to some other bootloader. If there are any mismatches, YMMVW (your mileage may vary wildly, up to and including s gyre of flames spewing into the sky).

Other procedures involve mounting the HDD file system and various system directories (like /dev, /proc, /sys and /run) then using chroot to make /mnt the new root of the system. This is the way you would most likely do it if you had GRUB2 installed on the HDD and wanted it to install itself fairly automatically — it would need to be run from the system on the HDD in question, because that meets the programs expectations. As I said, I dunno about installing GRUB2 without chrooting.

SLiTaz is perhaps not the most representative OS.

Note: I am saying HDD because SliTaz is in my case being used on a legacy system with a HDD. I don’t see why it would matter whether it is HDD or SSD.

An explanation

The partition I want to boot (/dev/sda3) is mounted to /mnt , and the live CD can see the drive that partition is on (/dev/sda). So the command tells the installer to write the initial boot stuff to the drive and any other stuff to the mounted file system. That it works is a pleasant surprise, and given how often I futz things up, something that I’ll probably have to use again some time.


cor

Windows if you have a sticker

Short version:

Using dd to write the Windows install media ISO file to a USB stick did not result in a bootable USB (at least on my system); writing the install media to USB with the Windows Install Media Creation Tool (which means using a Windows computer to create the installer) worked.


Picked up a second-hand Core i5 small form factor (SFF) machine. Has a Windows (7 — it’s a few years old!) sticker with a product key.

Put a HDD in it and …

https://www.microsoft.com/en-us/software-download/windows10ISO

I have a working a Linux box, so downloaded an ISO — it is called Win10_21H1_EnglishInternational_x64.iso. Took a few hours on my ‘adequate’ connection.

The page has SHA256 hashes on it, so I verified the download:

$ sha256sum Win10_21H1_EnglishInternational_x64.iso

And then wrote it to a USB stick. Before inserting USB stick:

$ lsblk > before

After inserting the stick

$ lsblk > after

See what has changed:

$ diff before after

13a14,15

sdj 8:144 1 14.6G 0 disk
└─sdj1 8:145 1 14.6G 0 part

OK, so the device is /dev/sdj

I used a brand new stick because I happened to have one lying around. Reduces the chance of a bad copy.

We need it unmounted but in the machine:

$ sudo umount /dev/sdj

$ sudo dd bs=4M if=/path/to/Win10_21H1_EnglishInternational_x64.iso of=/dev/sdj conv=fdatasync status=progress

(See https://www.howtogeek.com/414574/how-to-burn-an-iso-file-to-a-usb-drive-in-linux/)

We can mount it and see what’s on there:

$ caja

$ ls /media/username/CCCOMA_X64FRE_EN-GB_DV9/
autorun.inf boot bootmgr bootmgr.efi efi setup.exe sources support

OK! Now, I start the Windows machine, hit (in my case) Esc to open the BIOS/boot settings and make sure it will boot from a USB device (it may call it a USB floppy or USB HDD or USB CDROM, but a USB flash drive should work too).

Insert the USB and give it a go …

Cannot find a boot option that will boot from the USB stick. Even when I specifically select the stick, it tries to boot from the HDD.

In the end, there were 2 things I did.

  1. I wrote the USB stick using the Windows Install media creator (that meant getting access to a Windows computer).
  2. I went into the Recovery menu in the firmware and it found the USB stick and booted into the Windows installation environment.

Install Windows!

OK, we got there in the end.


Reinstalling Windows

Windows 7 laptop with Windows product key sticker on the bottom.

Hard drive failure, so cannot use recovery partition.

Model: ASUS K43U – old enough that Win 7 would be a better fit for it, but little choice AFAIK. (Well, I could install Linux etc, but I have a Linux laptop. This is meant to be my Windows machine, for working with the non-geek world.)

  1. Went to a working Windows machine
  2. Went to https://www.microsoft.com/en-us/software-download/windows10 and clicked ‘Download tool now’
  3. Scrolled down to ‘Using the tool to create installation media’
  4. Put a working 8GB USB stick into the computer
  5. Ran the tool (needs admin)
  6. Got 2 options (1) update this computer (2) make installation media
  7. Chose (2)
  8. Then can do an ISO or USB. Chose USB, chose the relevant drive (E:) and left other things as defaults. (One might need to change to 32-bit Windows 10 for the download, I guess, if that suited the hardware.)
  9. Waited for a while as it downloaded and wrote to the USB and stuff
  10. ‘Your USB flash drive is ready’ – clicked next, and safely ejected it, put it into the laptop. Put the laptop on an Ethernet connection
  11. Booted laptop, holding down F2
  12. Enabled UEFI, then saved, exited, rebooted, reentered BIOS and it found the USB stick and added it to the boot list automagically; edited the list to put the USB at the top, saved and exited
  13. Booted into install program!
  14. Set language and hit Go (‘Install now’)
  15. Provided product key off the sticker on the bottom
  16. Accepted licence
  17. Chose: ‘Custom: install Windows only’ (this is not an upgrade, so did not choose the Upgrade option)
  18. Partitioning GUI – used the whole disk; deleted any existing, created a single new one, agreed that Windows might need to create other partitions
  19. Clicked ‘Next’, and away it went, copying stuff and so on
  20. Click through some menus, making selections (eg keymap)
  21. It rebooted, still with USB stick in …?
  22. But all is well. Continued with the installation
  23. Chose various privacy options (mostly turned things off)
  24. No thanks to Office trial
  25. Deleted a bunch of programs I don’t want
  26. Updated and kept removing cruft
  27. Now as usable as Windows will get on this old machine

OK, that’s not a bad process. It is good of Microsoft to make recovery as easy as that. And they still provide Win10 to users of Win7; not that I like Win10, but it’s nice to be able to install something.


Good on ’em. 

Updating my Debian box — a non-expert’s experience

My Debian desktop box was running the LTS (long term support) version (in other words, older than oldstable, getting minimal updates and getting outmoded and old and crufty), which is the 7.x series. Support for that even as LTS is scheduled to end May 2018, not far away.

So I bit the bullet and decided to update to current, which is 9.3 (‘stable’). I like Debian, rather than one of the many distributions derived from it. I’ve found for me it words pretty well. Most problems I have are with applications not the OS, and when I’ve fiddled around with other Linux distributions, I have generally found that they are different but not better, and often have fewer packages. So Debian it is.

I don’t have a great network connection where I live (in the bush in Australia, which has poor broadband even in towns), so rather than do a net install I downloaded the iso for the installation disk and burned it. This file: https://cdimage.debian.org/debian-cd/9.3.0/amd64/iso-dvd/debian-9.3.0-amd64-DVD-1.iso. I did not bother grabbing 2 and 3; I have enough internet to grab anything not on the DVD from the server, and eventually the DVDs get out of date.

I also made what I think is a good decision about backups. I began with a 1TB drive. Not big now, but  the computer is about 7 years old, I’d guess. Maybe more. It has an i7-2600K, which was a pretty good chip at the time. When I got it I was using it for numerical modelling, like here, but I don’t do much of that these days, and with 8 GB RAM it is still perfectly capable of running a responsive desktop, so I do not feel a need to upgrade the processing power or the RAM. Since then, I bought a 2 TB drive for storing media, and bunged it in the case and mounted it as /home/username/Music. Worked fine. So with that in mind…

    1. Went into VirtualBox and exported all the virtual machines I wanted to keep to an appliance, ‘Appliance.ova’ — this was a 34 GB file.
    2. Went into firefox and exported my bookmarks to a json file.
    3. Used rsync to copy /home/username (including the Music folder, since it was mounted at the time) to an external USB backup drive called SAMSUNG. Here is the rsync command, for reference:
      rsync -a -v -v -v --stats  --log-file=logrsync.log /home/username /media/SAMSUNG/home/
      

      and note that I have excluded nothing, since I want to keep my web history as well as the actual data. This command will grab stuff like .mozilla/firefox profiles and the like, though more on that later. The Appliance.ova file was also in a place where it would get backed up externally.

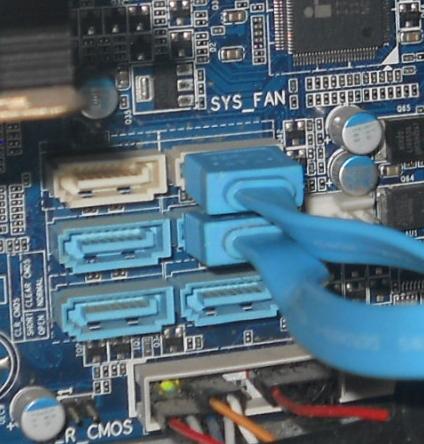
    4. Left the 1 TB drive in the case but disconnected power and SATA cables from it. Since I’d been getting some errors from the drives, I decided to use the second row of SATA sockets for the new install where previously I’d been using the first. So I plugged in the CD/DVD and the 2 TB hard drive into the second row of slots, the DVD into the white socket and the HD into the first blue socket. I made sure to use SATA cables with clips.

      Picture of the mother board and which SATA sockets I used.
      Using the right-hand set of sockets for the SATA drives instead of the left.
    5. Double-checked that the USB backup drive had all my data — /home from the 1 TB drive and Music from the 2 TB drive. Yes, it did. Also had the Appliances.ova and the .mozilla hidden directory with all my web history and stored passwords (more on that later). Disconnected it from the machine. So now only the 2 TB HD and the DVD drive were connected.
    6. Put Debian 9.3 DVD 1 into the drive and rebooted the computer.
    7. Pressed ‘Del during boot to bring up BIOS menu and selected CDROM as first boot device. BIOS menu showed that we’re using IDE channel 1, not channel 0 as previously. That’s OK.
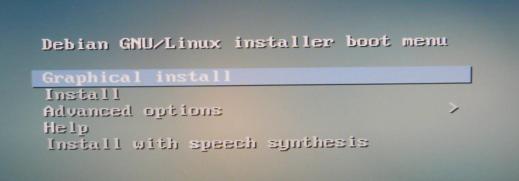
    8. Let the machine boot off the DVD and selected Install, not graphical from the menu. Graphical is probably fine but I’ve been doing this for a while and I have no problem with ncurses. Wired internet connection was in and on.

      Picture of the menu.
      Menu to select the Debian install method.
    9. Clicked through the install (Language, Location, Keyboard map, Hostname, Domain, Root password, User account, Clock

      Picture of the menu.
      Menu to select language.
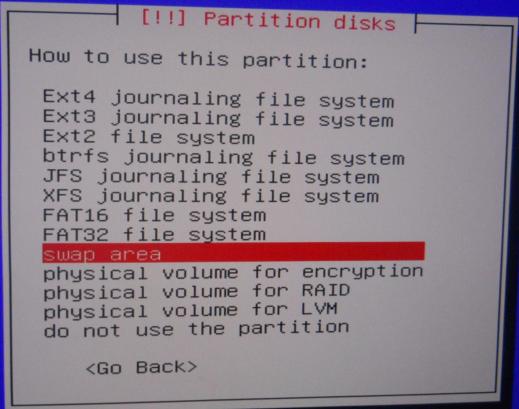
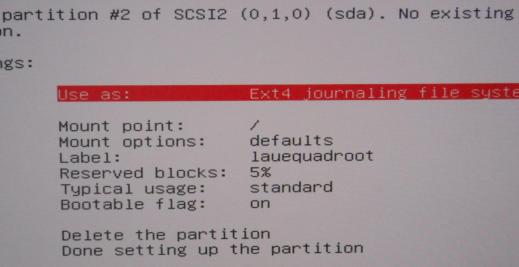
    10. Partitioned the HD. SCSI 2(010)(sda). Whole device. 16 GB swap (2 × the RAM), then rest of disk at ext4 Linux, mount point ‘/’, and set this partition bootable. Done.

      Picture of the partitioner screen.
      Partitioning — setting up swap space.

      Picture of the partitioning.
      Setting up the root partition.
    11. Write the partition information to disk.
    12. Start installing.
    13. Threw a corrupt file error while installing the base system and dumped me into a text menu. Selected ‘Install base system’ or whatever it was (ie, have another go, please) and it went through. I only installed the base system (ie, command line tools).

      Picture of the error screen.
      Red screen means error.
    14. Linux image was amd64, and the kernel image (it told me) was 4.9.0-4.
    15. Told it I was not scanning anymore DVDs.

      Picture of the apt configuration screen.
      Setting up apt (the package management).
    16. Yes, please set up a mirror.
    17. Chose a mirror and let it configure apt. It said something about ‘upgrading’ but I don’t want to toast my bandwidth so I turned off my router. For now I just want to use the DVD, so once apt was configures with the correct mirror, I figured it would be OK to turn off the internet.
    18. Chose some software, set it to install but it halted at one pointed — needed to get something from the net, should not have turned it off yet. Reran with net on and ok.
    19. Yes, GRUB to MBR, please.
    20. Rebooted with web off. Changed BIOS to boot from HD and left DVD in as a file repository.
    21. As root, edited /etc/apt/sources.list and commented out the web repositories for now.
    22. apt-get update
    23. apt-get –install-suggests install mate-desktop-environment.
    24. Chose gdm3 as my display/login manager, since MATE and Gnome should work well together.
    25. Added some other stuff using apt-get; xsane, libreoffice, that sort of thing.
    26. Plugged in backup USB HD and, with a command line open in /home/username/, coipied all the backed-up material into my new home directory:
      cp -irv /media/username/SAMSUNG/home/username/* .
      cp -rv .[^.]* .
      
    27. Edited /etc/apt/sources.list to remove comments from web repositories, now that the bulk of the software was installed.
    28. Downloaded VirtualBox installer from https://www.virtualbox.org/wiki/Linux_Downloads.
    29. As root, installed a few packages it needs:
      apt-get install dkms
      apt-get --install-suggests install linux-headers-amd64 linux-headers-4.9.0-4-amd64
      apt-get install  libqt5opengl5
      dpkg -i virtualbox-5.2_5.2.6-120293~Debian~stretch_amd64.deb
    30. Then ran VirtualBox and imported the Appliance.ova file, and there everything was. Once I installed the guest additions, it all worked smoothly.
    31. Ran Firefox. Despite the exact copy of the old profile directory, it remembered nothing. I tried running firefox -P and selecting the profile that matched the old one rather than the new one it had cfreated, but that did not seem to help either.
    32. Mounted the old 1 TB HD using a SATA to USB adapter and recopied old profile directory from the 1 TB HD to the new directory (profiles live in /home/username/.mozilla/firefox with filenames like brqhj45.default-1234456787655).
    33. That fixed my passwords but not the bookmarks.
    34. Within the bookmark manager of Firefox, imported the json file I created in step 2, and that fixed that. Done.

So at the end I had my old root drive (minus the Music folder) on the old 1 TB drive as emergency snapshot and backup, I had a current backup on the external USB HD (including the Music folder) and on the 2 TB drive, which used to be just the Music folder, I had everything, including Music.

Still got some issues with Windows progs installed under the old wine not working with the new one — but install media not working with new one either so cannot reinstall…

Relatively painless.