The wine project is very impressive. Old Office 2007 DVD, so why not? Word has not changed much in 20 years. Had to do some cleaning up first.
I used PlayOnLinux but chose manual install and pointed it to the setup.exe file on the DVD, and specified 32-bit to matchthe Office version (and made sure 32-bit wine was installed).
Installer ran succeasfully; clicked Close.
PlayOnLinux asked about shortcuts to make. Chose Winword then Excel and PPT; they appeared in the PlayOnLinux dialog.
The software wants to be activated… but the software is very old! I chose over internet, and it seemed to work. ??? (Or more likely just did not complain.)
Cannot sign up to Microsoft update service, of course.
But seems ok. Works basically seamlessly.
I find I can print from Word 2007 to any of the printers installed via CUPS — for example, my Apple ImageWriter II.
So I can run Microsoft Word from 2007 on Linux from 2022 and print seamlessly to an Apple printer from 1986. Now that’s convergence!
This was a simple answer but I went the long way round. The basic problem is that it is hard to find definitive advice on what the cable should look like. I can only say what worked for me!
I have got it to work with an FTDI-based USB-to-serial convertor, which means any computer with a USB port that can drive one of these dongles should work. So your new Mac should (should) be able to drive your ancient printer. Please note, though, that I have used Linux, not a Mac, for this.
I have a very cheap CH340-based USB-to-serial cable. It does not work with this printer, at least not in my experience.These cheap ones are often like that, and should be avoided unless you’re prepared to just ‘have a go’ and chance it.
I bought the ImageWriter II (and a lot of accessories) off an auction site for around $20.
Imagewriter II, sheet feeder, lots of ribbons, manuals, print cable
What can I say? I like dot matrix printers. Pure stupid nostalgia.
Now, I do not have a Mac, not a modern one, not one from 1987. The manuals for these things include BASIC programs you can use to control the printer … they truly are from another time. Yet…
Linux tends to be great for backwards compatibility. I have some USB-to-serial thingies.Can I print to the IW? Well, Apple did not use the RS232 serial communications protocol, but the one they did use (RS422?) has enough in common with RS232 to be made to work.
Then, did the printer self-test (power off, hold down form feed, power on and and let the buttons go). This revealed a sticky print head, and I cleaned the cylindrical rail with lint-free cloth and isopropyl alcohol (do not grease/oil!). Repeated until the self-test showed the print head was moving freely.
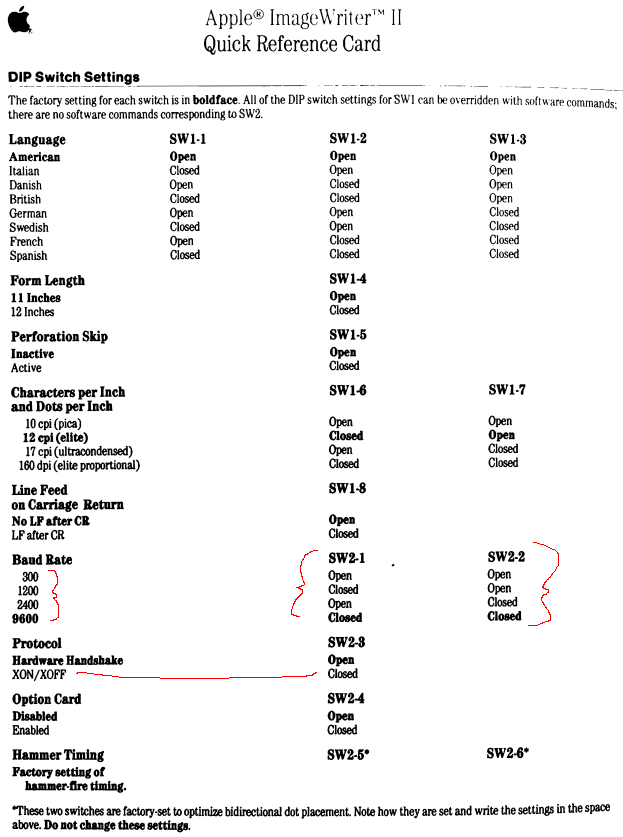
I set the DIP switches so that the unit was communicating at 1200 baud (with a fudged protocol, I decided slower might be better). This is set using DIP switches.
For 1200 baud, we set SW2-1 (first switch on second bank of switches) to closed (‘down’ when looking at the printer from in front) and SW2-2 to open. 1200 is the slowest the CHIPI-X10 FTDI-based convertor can handle.
Also at this stage switched SW2-3 to closed to make it use software handshaking (called XON/XOFF), because the RS232 does not share the same hardware handshaking wires as RS422, but it does share the data wires.
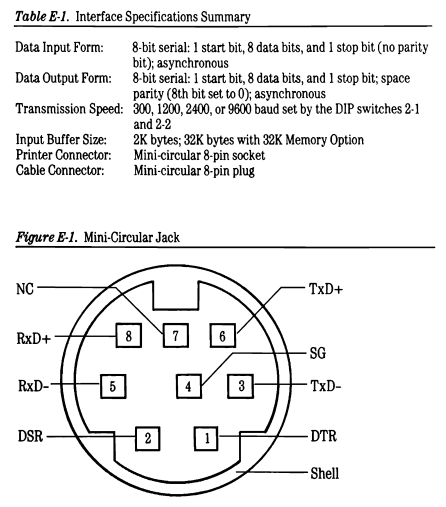
Then I had to make the cable to go from the female 8-pin mini DIN on the back of the ImageWriter to the male DE9 (often called DB9) plug on the USB-to-serial convertor.
I did this the hard way, which is to say I bought the parts from Jaycar and manually soldered wires between them. Maybe there are existing cables? It would be easier to buy a cable with the right plugs and if need be adjust the wiring by cutting it in the middle — soldering pins on mini DINs is a mug’s game. Anyway, cost me about $5. DB9/DE9 pin numbering is here (and in many places online, and the numbers are printed on the plug if you look close enough.)
The required DB9 to DIN 8 cable is not the one in the back of ImageWriter manual. Thankfully, it is simpler; 3 wires:
pin 3 on (male) DIN to 3 on (female) DB9
pin 5 on DIN to 2 on DB9
pins 4 and 8 bridged on DIN, then connected to 5 on DB9.
That’s it.
If we look up the details on plug wiring, we see that 3 on DIN is TxD-, and on the DB9 3 is TxD, so this makes sense. We also find that 5 on DIN is RxD- and 2 on DB9 is RxD, so this makes some sense.
Further, 4 on DIN is ground and 8 is RxD+, and 5 on DB9 is ground, so this make some sense too.
Some resources talk about bridging 6 and 1 on the DB9; this did not work and in fact prevented the cable from working.
So we have 3 wires and a bridged pair of pins.
I then plugged my adapter cable into a FTDI USB-to-serial device and plugged the device into the Linux box. By looking at the contents of /dev before and after plugging in, I could the name of the tty that was created.
For example, you could go (in your terminal window):
$ ls /dev > before
Then plug it in. Then:
$ ls /dev/after
$ diff before after
In my case, this showed that /dev/ttyUSB0 was created. To get the current serial port setting, you can type (if stty is installed; if not install it first):
$ stty -F /dev/ttyUSB0 -a
Now, I knew the baud rate (1200 in my case; 9600 is the default) and the handshaking (which was set to XON/XOFF because of the missing wires). Now I fired up CUPS (ie on Linux opened Firefox and went to locahost:631, assuming CUPS and its web interface are installed).
Administration > Add Printer > USB Serial Port #1 > Baud 1200 (matches DIP switches in the printer; you might want to choose something else), no parity, 8 data bits, xon/xoff flow control.
Stepped through the rest, choosing the iwhi driver (not the C. Itoh one). Note that the serial port will not be configured until you try a print job — so try a test page, then rerun stty command to see the differences, if you’re curious.
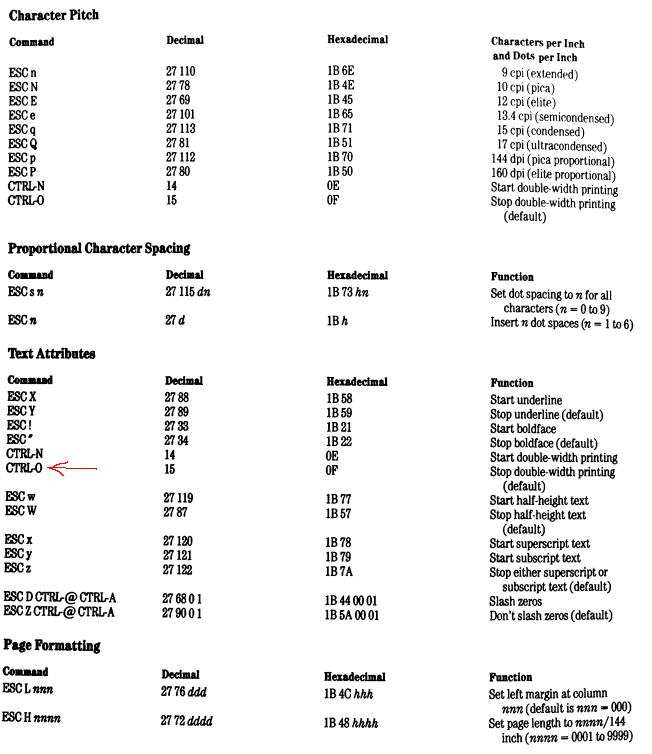
Looking at this told me I needed to send character code Ctrl+o to the printer to turn off double-width mode.
Tried to use Vim, because Ctrl+v should allow insertion of a verbatim keyboard code, but instead it launched visual mode. Instead, used ‘ex’ mode of Vim, and created a file that contained nothing more than a Ctrl+o keyboard code (here are the commands needed):
$ ex filename
 i
Ctrl+v
Ctrl +o
Enter
.
Enter
w
Enter
q
Enter
This is a bit cryptic, so I will explain. First, I run the command ‘ex filename’. This runs the ex editor and opens a new file, called filename.
I type i to begin inserting text (like vi/Vim). I then type Ctrl+v followed immediately by Ctrl+o. This inserts a Ctrl+o ‘character’ into the file. Then I hit Enter.
I then type a stop on its own and hit enter — this tells ex I have finished entering text (edlin, anyone?). w writes the file and q quits.
Now, I had to send this code to the printer, but I did not ‘print’ the code, I send it directly (probably printing it would work; I just did not do that). The Linux command cat types a file. I can type this file to the printer by:
$ cat filename > /dev/ttyUSB0
and now it prints correctly. This sort of method can be used to send all the various codes to the printer, which means you can control it from the command line just as you would have done using your old Apple computer and Apple BASIC.
Codes like these underlie much printing. You can turn text bold, underlined, half-height, superscript and so on. Early word processors would send these codes to the printer (different for every printer) to format your text, and asking for (say) italics (if your printer had italics!) was equivalent to embedding one of these codes in the stream of characters.
Anyway, it works.
(I did use rather dirty paper… but a dot matrix can handle that.)