
This is a Canon Typestar 220-II (or Typest🟊r, according to the logo). It is a thermal transfer typewriter from the 1990s. Such a machine can print in 2 ways. If you have: thermal paper in it. — like a fax roll — the heating elements in the print head work directly on the paper and turn it dark where it is heated and so print the letters. This printing method is extremely common, because most receipt printers — for example, at the supermarket – – use this form of printing. One of its most important characteristics is that the print will fade over time. That’s why when you find an old receipt left on the dashboard of your car or wherever, it can be faded into uselessness. The other way these machines print is by using thermal transfer ribbons. These used to be common in what were advertised as ‘plain-paper fax machines’. Many fax machines used thermal printing on treated paper, as noted above, but fax paper is thin and the prints do not keep well. By using the thermal print head to melt a black plasticky ink and transfer it to the paper, you can use a thermal print head to print on non-treated paper and also get printouts that last longer. The big problem with this method is that you need the thermal transfer ribbons, and for most of your old typewriters that use the method, they are very difficult to obtain, and often cost a lot more than the machine — this typewriter cost me $12, and I only paid that much because I was feeling supportive of the small business trying to sell it. The cassettes that go in it to allow printing on non-thermal paper can often cost $20 or more each, if available at all, and while the ones in the 220-II are larger and last longer than in some of the other Typestars, they still don’t last that many thousands of words.
Because these days most text ends up in a computer, the transience of thermal printing on treated paper is not such a big deal — I’m going to scan and OCR this text anyway, so after that I don’t care if it fades away.
A quick review of the 220-II; it is a neat unit. It is quite capable — large character set available through not only keyboard but also a scroll-through menu that gives you Greek, mathematical and various other specialist symbols like hearts, diamonds, clubs and spades, the Typestar star (🟊), and so on. The keyboard is like a membrane computer keyboard, and is perfectly adequate. The spell checker works very nicely. We have a small LCD screen, and you can set the machine to only type a line when you complete a line. That means you can fix the spelling before it types out. If the checker is turned on, it will beep when you complete a word that is not in the dictionary. This then prompts a review and you can fix it before it prints. You can, ask the dictionary for suggestions, but usually it is quicker to just fix it. There are many other features, like larger fonts, bold, underline, shaded backgrounds, and other stuff I would probably never use.
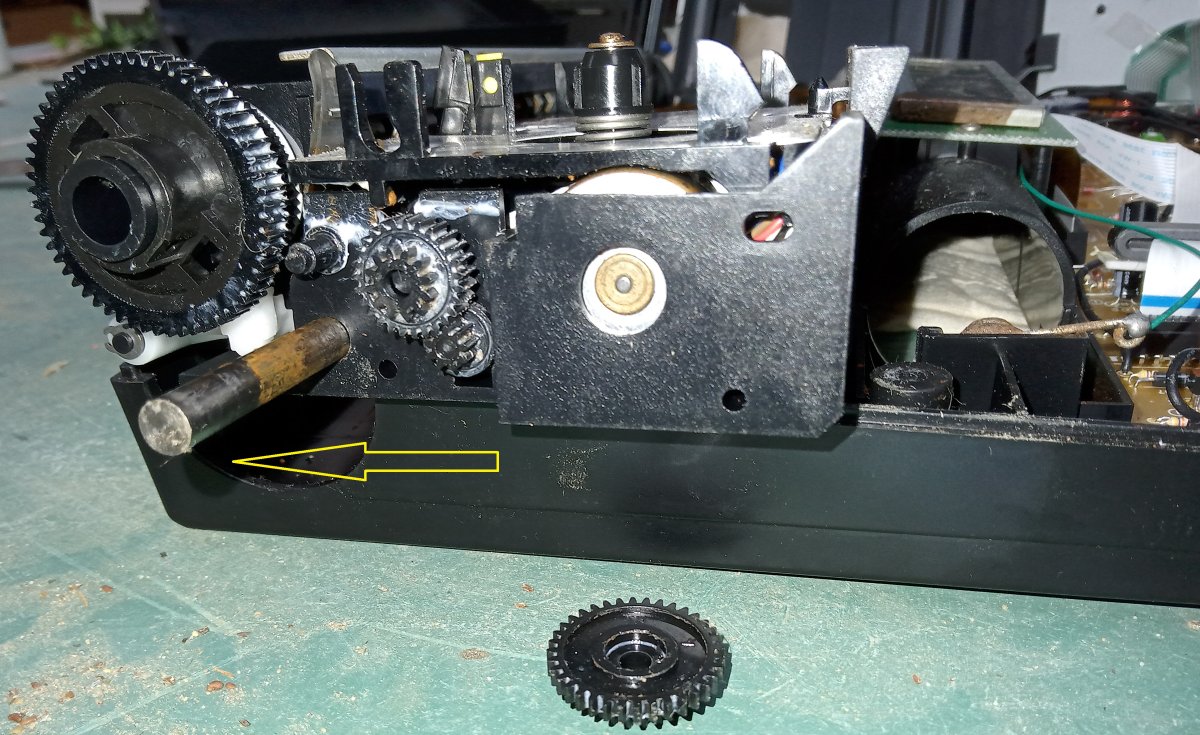
Now, when I got this, I bought it in an online auction and when I got it home it did not work. The first and most obvious problem was the rust on the battery terminals. That was easy enough to fix — undo the screws in the bottom and at the back, lift off the top (being careful to keep the ribbon cable to the keyboard in place, seeing as the keyboard comes away with the top) and use a file or some emery paper to clean off the rust. That allowed the things to start when I put the 4 D cells in it, but the printing head would not move. It tried, but failed. The usual reason for this is that the cylindrical rail that it runs on is grubby and/or rusty. And so it was. To remove this I had to lift the printing tray out of the chassis and remove the gears on the left-hand end, then remove a small screw, arrowed in the photo, that holds the rail in place. I could then slide the rail. out and clean it thoroughly. I wanted to also clean the holes in the print head carrier that the rail runs in — no point cleaning the rail if there’s dirt in these guides. To do this, I had to remove the thinner rod that is part of the drive mechanism (it also slides out if you remove a gear or two) then I was able to stand the print carriage on its end (picture) and give the underside a proper clean. Reassembly and testing showed that these things did indeed fix the unit, and now it works as if it were new.


The 220-II does give an impression of being more built down to a price than some of the earlier Typestars. The case is a thin shell of plastic, the platen knobs just feel thin and cheap, like the plastics themselves are thinner and not as good quality as they might be. Being a fairly late machine (1994 on one of the circuit boards), it has more capable electronics than some of the earlier machines, which is nice, and if they have cut corners, they have not done it in a way that shows in the typing experience — that is, the keyboard is fine, and in fact very usable. I have found that the two things I had to do to get this to work — clean up the battery terminals and clean the rail for the print head — are very common issues on all kinds of electronic typewriters, whether thermal wedges or larger, ribbon-based desktop machines like your daisy wheel designs. (Well, the desktop ones won’t have battery terminals…) and if the print head tries to move but can’t, look at the rail, and if nothing happens at all in a battery-powered one, look at the battery holder terminals. Now I must go and do something that actually needs to be done, instead of messing around with ancient technology.


