
Slitaz is a compact Linux distribution that hits a pretty solid sweet spot between efficiency and functionality. That makes it an excellent candidate for a small-footprint install inside a virtualisation environment for when you need a little bit of Linux to get a few jobs done.
For us English speakers, it lives at http://www.slitaz.org/en/
It comes in two styles — conventional stable releases, and a rolling release that is a little more up to date but might also be a little less stable. I decided to look at the rolling release. Downloaded from here — install image only about 45 MB! http://mirror.slitaz.org/iso/rolling/slitaz-rolling.iso
So began by starting VirtualBox and creating a new machine. (New; Name: Slitaz rolling Type: Linux 32-bit; other.
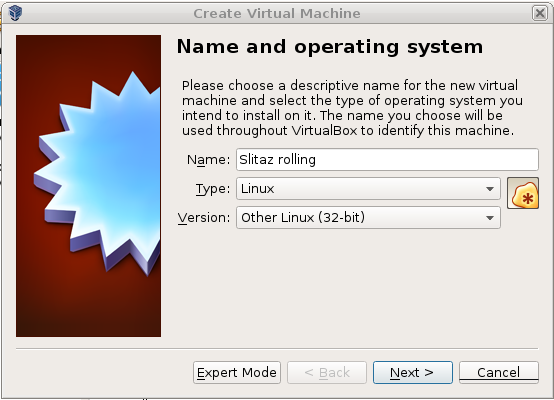
RAM: 256 MB
Create HD
Type: VDI, Dynamically allocated
Size: 8 GB
OK, went into:
System → Processor → enable PAE/NX
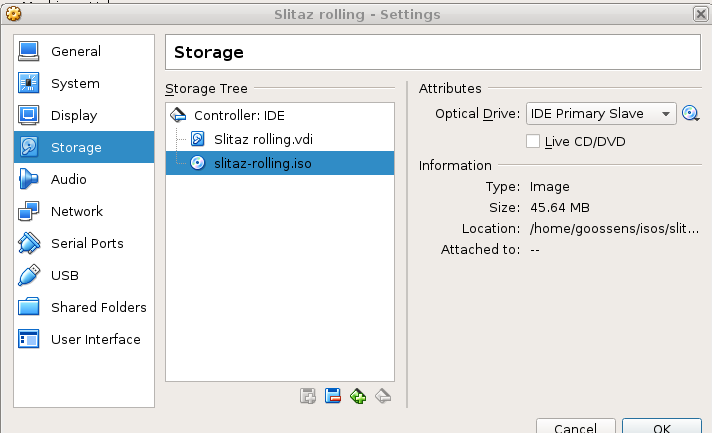
Inserted the iso using the Storage menu
Double clicked to boot
Booted Slitaz Live (first entry on list of boot options)
Waited and eventually (host is not a fast machine) got desktop
Applications → System Tools → GParted
root password is ‘root’
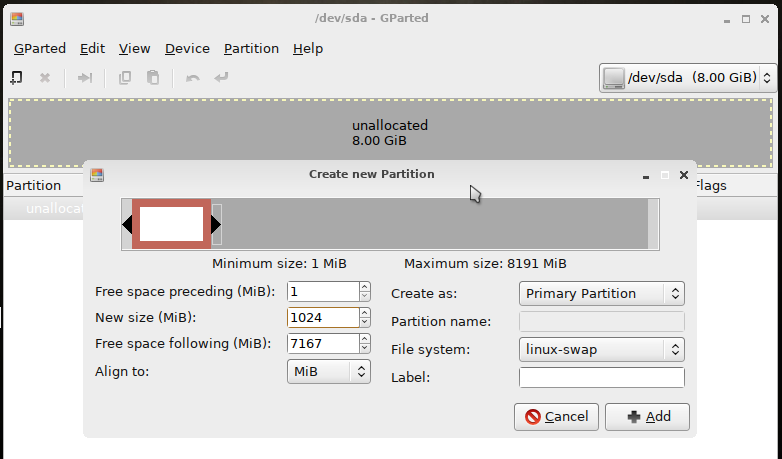
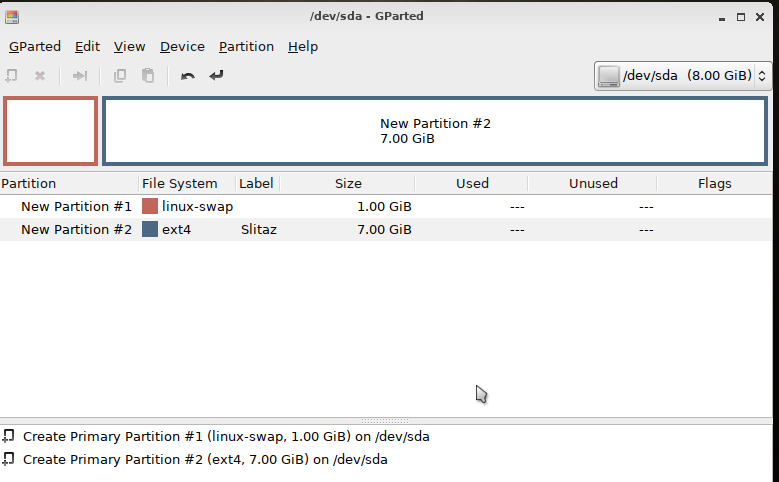
Device → Create partition table → MSDOS
Right clicked on unallocated space and created 1024 MB swap
Then made the rest ext4 Linux (I called it Slitaz)
‘Applied operations’
Waited till competed and exited GParted
System tools → Slitaz installer
Clicked ‘Install Slitaz’
Already done partitioning, so ‘Continue installation’
Selected ‘Install Slitaz to partition’ /dev/sda2
Set root password
Set up a user
Checked ‘Install bootloader’ then click ‘Proceed to Slitaz installation’
Nothing happened…? Waited quite a while. Clicked ‘Back to installer page’
Clicked ‘Install’ again
This time executed GParted from the menu, in case the installer ‘needed to know’ it had been executed
So opened then exited GParted, then continued with installation
Told it to format /dev/sda2 as ext4 (just to give it something to do)
Clicked ‘Proceed’ again; waited a really long time
Install proceeded — possibly I should just have waited longer the first time…
Chuntered away and then exited abruptly, leaving me with the desktop
Applications → Logout → Shut down
Interesting; VirtualBox manager noted machine as ‘Aborted’…?
Removed iso from virtual drive in the Storage menu of VB manager, then booted the VM
No luck; maybe install was incomplete?
Put iso file back in and repeat steps above (no need to repartition) but waited longer for each step to complete
Did not run GParted again, just clicked through, did not format partition
This time, the installer did not quit early, but finished and gave me an ‘Installation complete, you can now restart’ option
Clicked that option but then powered down after it started to reboot off the livedisc. Removed the iso and booted
logged in a normal user. No worries
Got TazPkg windows about recharging package lists; said OK
Typed root password; let it run then clicked ‘Check for upgrades’ — should not be many, it’s a rolling release. Came up with about 9 packages.
Clicked ‘Toggle all’ and ‘Install’ and watched it run.
Except for installer dropping out the once as noted above (and it might have been me do something odd…) install was very easy; only complexity was the need to run GParted yourself (no ‘auto partition’ option), but GParted is pretty easy to use.
———————————————–
Next, dkms, linux headers, guest additions…
Searched for dkms in TazPanel and it was there. Excellent. Checked the box for install. Searched for ‘headers’ and found ‘linux-module-headers’, so checked that for install. Then installed. Watched it do dependency tracking and then start installing. Very nifty.

Went to ‘Devices’ menu at top of VM and put in the Guest Additions image. In xterm on the guest, typed ‘su’ and logged in as root, then
cd /media/cdrom
And ran the VBoxLinuxAdditions.run script; it would not go! Permission issues, even though I was root.
Dunno why… as root, copied the file off to /home/username/ (username is the name of the user I created in the install — replace with your username) then
$chmod +xw VBoxLinusAdditions.run
and then ran it from there. It ran, but gave an error: ‘failed to set up vboxadd…’ but then I relaised I had not rebooted (installing dkms needs it, I think) and tried again.
This time, I logged in as root when I got the GUI login prompt, rather than using su.
Opened xterm, cd to cdrom, tried to run ./VBoxLinuxAdditions.run but again failed. Still would not run from /media/cdrom, but the file I copied over to the hard drive worked fine, and guest additions were installed.
Success!
OK, shared folders.
Rebooted guest, logged in as user (not root), opened a term, created a folder called sharetaz inside my /home/username directory. chmod 777 on the directory
chmod 777 sharetaz
(This is not good for security on a shared machine. There are better ways; though this is quick and easy, and reasonable in the context of a VM that one user is running when logged into their own desktop.)
On host, I decided to share my /home/username/Work folder, so just left that alone.
At top of running guest, clicked: Devices → Shared Folders → Shared Folders Settings → Add Folder Icon’ (i.e., clicked the folder plus a plus sign icon on the right).
Selected the folder on the host (easiest to use the pull down menu to select ‘Other’ and then browse). Selected ‘Make permanent’ and ‘Automount’; why not.
Gave it the name ‘Work’ as an identifier for the next step. Then saved and ok and exited from the setting dialogues.
In xterm on the guest:
su
typed root password
Then:
mount -t vboxsf -o uid=$UID,gid=$(id -g) Work /home/username/sharetaz
Failed; I checked outputs of ‘echo $UID’ and ‘echo id -g’, and both seem kind of empty. So got those values manually.
id -u username gives 1000
id -g username gives 1000
(remember, username is your username — darren, smith, whatever) so ran (still as root)
mount -t vboxsf -o uid=1000,gid=1000 Work /home/username/sharetaz
then exited su
then cd into sharetaz, and yep, there were the files in Work on the host.
Made a small file
vi textfile.txt
added some content, saved, could I see it on the host?
Yep, plus could edit file on host or guest. Looks like done!
I put the mount command in a small script which I can run as a superuser or via sudo (when I install sudo) when I need it. There are ways to mount the automatically on boot, but I can’t be bothered.
When I reboot, the share folder is empty. If I open a term window I can type
su
root password
/path/to/mount_share
exit
and there it is.
